Chris's replication of Andrey Melnichenko's GLED

  • Topic Is Sticky
  • 6.1K Views
  • Last Post 12 December 2022
Chris posted this 13 February 2020

My Friends,

I am going to have a go at replicating the GLED of Andrey Melnichenko.

If this project helped you, please consider a Donation:

Donate (Patreon)


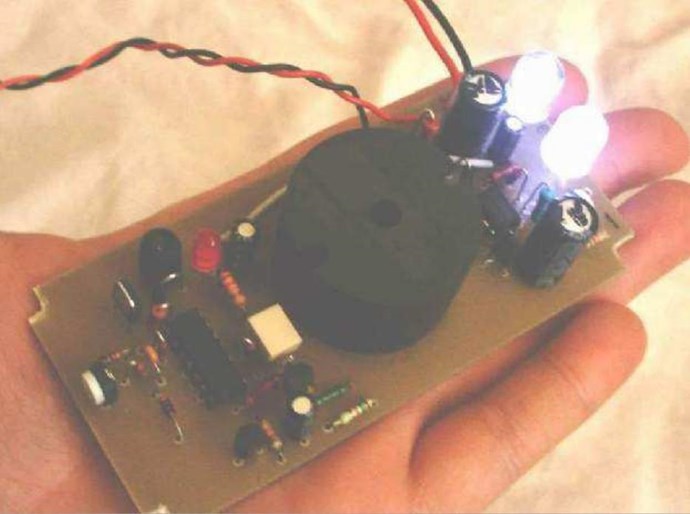
Please Note: My work, shared here: Chris's Non-Inductive Coil Experiment, is related to, the same concepts as, this work. But my experience outside of what I have shown you is limited. I have worked on this before, but it was a long time ago, and on a breadboard:


I am re-replicating this experiment for my own and others benefit. No guarantees here guys, ok. Lets just do our best here. I am sure we can do it again wink

Some history behind the GLED, first designed and shown by Andrey Melnichenko and friends back around 2000. Some videos exist, the face of the person holding the GLED is Arthur Tränkle, currently the CEO of Steho Energy:


We have a thread here: Akula's circuits- is this the principle? that also has a LOT of information on this device! Its worth going and studding that thread also!

Akula, Roman Karnouhov, replicated the GLED and never gave Andrey Melnichenko any credit for it! Akula, Roman Karnouhov, did post this to the realstranik forum:

All schemes to develop and execute on principles of operation (Transgenerator magnetic field Andrey Melnichenko) and what to do with Pantyuhavu have!


Some months after the replication, Roman Karnouhov started working for Arthur Tränkle, and Steho Energy:


The Video Transcript:

they don’t burn, but we have a voltage going on here goes 19 hertz 19 hertz is going on I'm not talking about what signals of their time and about his time about everything else I have no right we go to this spoon 1910 the power goes 2 and 6 volts and what do we see in our coils in our coils we see here the signal that the vadik showed, but I have it a little stronger since I’m just not the first time to assemble this design with a similar design so I have more serious fronts, that is, we feed 2 and 6 volts and we see that the pure moreover, we supply 2 and 6 volts and a frequency of 19 hertz, but this the transistor and what we see undamped oscillations, our coil, together with pyrite, it buzzes and at a cleanliness of 293 it becomes a little wrong this is 290 kilohertz here are our non-damped oscillations, that is, this is the beam now it’s on the collector then on the collector of this transistor it’s just we see our 19 hertz the whole set of work of the ether of a given coil design in automatic undamped oscillations oh well, now I think I’ll show the operation of the voltage, that is, now I will increase the supply voltage to That operation of our voltage stabilizer before they work on the diodes light up, that is, you can now add a little bit so 2 of 6 here are 2 and 6 and our LEDs are on, they light up and two of our undamped oscillations became even more than 10 volts here on the collector undamped oscillations with the frequency of the resonance firm and the overall design turned out to be 10 volts, that is, in principle, the record itself can now be made even without this generator, well, it is necessary for stabilization, since we have a load, there are nights, I can say wadik For you, but great successes, good luck, I’m glad that in just about a year and a half I see a person who with his own mind reached it with his own hands, launched the scheme, was able to stabilize this process and get the scheme so-called free energy, I won’t even collect the scheme for all unbelievers and bitches can consult with the author, he will tell you that this is the true work of this device to tell you more too I have no right do not be offended by all the questions to the author of this scheme, but a very original solution is generally very original Inalnaya, but only with this original solution we need to slightly change the design, that is, Vadik I can say for sure because this is not the first time I have assembled this design for such power and there are two but three LEDs in which your mistake was, it’s purely you will understand only you were the mistake in that you have two LEDs, but I didn’t actually consider it, maybe I didn’t see it, I don’t know, but I couldn’t turn up the power because you had two LEDs in parallel, you need to sequentially and here, at the output, raise a little voltage yes, of course, your return line will start up well and that’s all, but also what can I say? This is a microcircuit of working with this transistor that eats a lot, just eats the power of one of the LEDs, that is, it can be replaced with a simple multivibrator, it will be much more economical to form of what is needed here precisely with this generator, well, guys, see the free energy, he’s so very glad I’ll be talking with you, maybe even work together so that you don’t see something I even know a new share something very glad I will talk to you and indeed to discuss something interesting for the future, we


The Video Transcript:

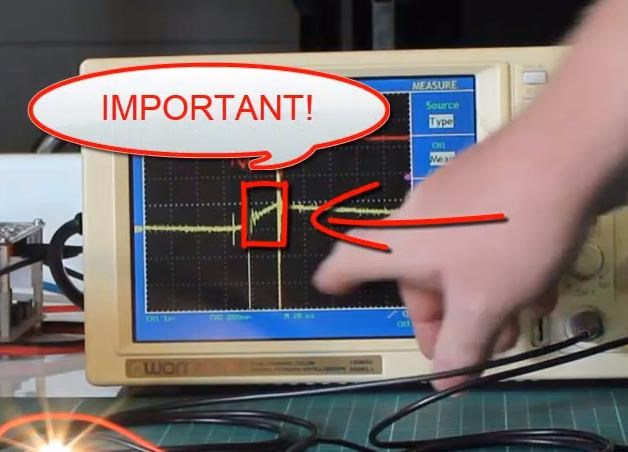
so well, what’s happened, I’ll show it’s most interesting, it’s not loving now, it’s not working at all yet, I haven’t completely caught up with all the signals, tested the working principle of forming a low-frequency resonance in seconds, that is, our face of cultures is output and this capacitor is what we have here it is here it is so here we have a series of bursts of pulses from them we see the low-frequency component and what’s actually looking for this thing is f**king erase three monsters I’ll rewind the general resonance of the fer Rita does not match for the formation of a low-frequency sinusoid I can’t raise the power then you have it for the last time I’ll be holy he would understand now we are looking for this one now it works like this


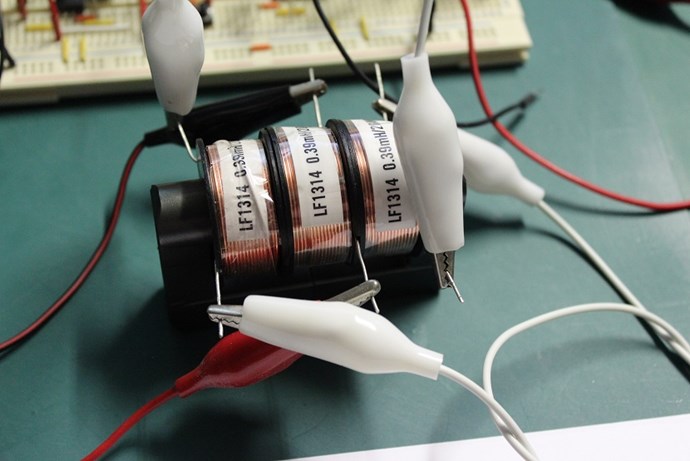
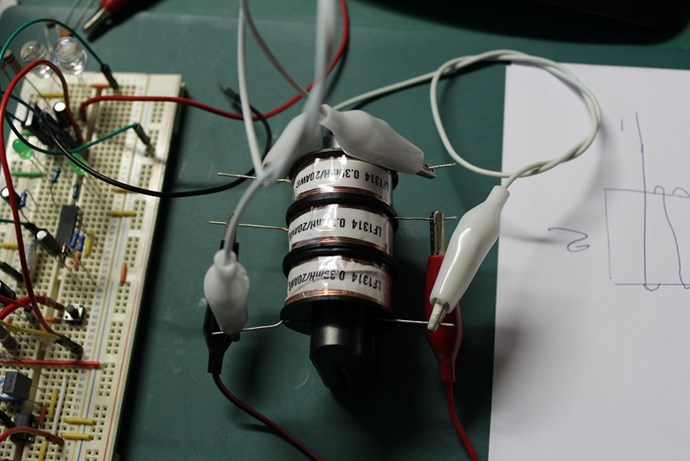
Observing the approximate lengths, where each unwind is approximately an arms length, about one meter, we get the following lengths:

23 arm lengths

26 arm lengths


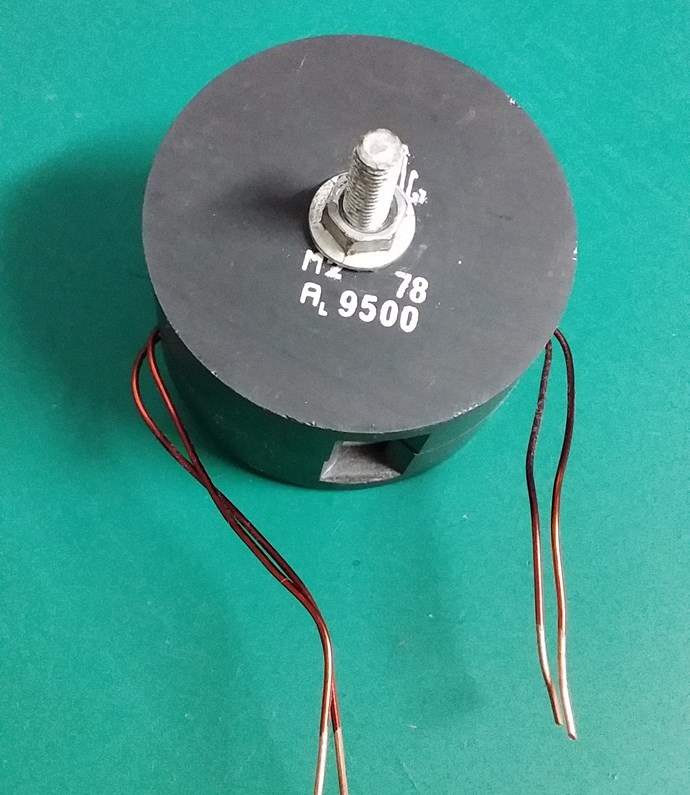
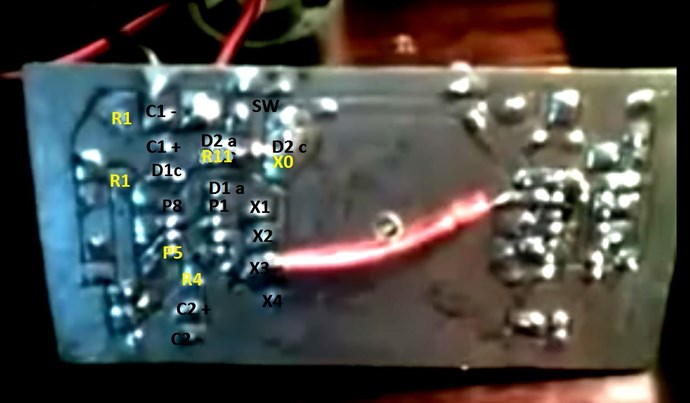
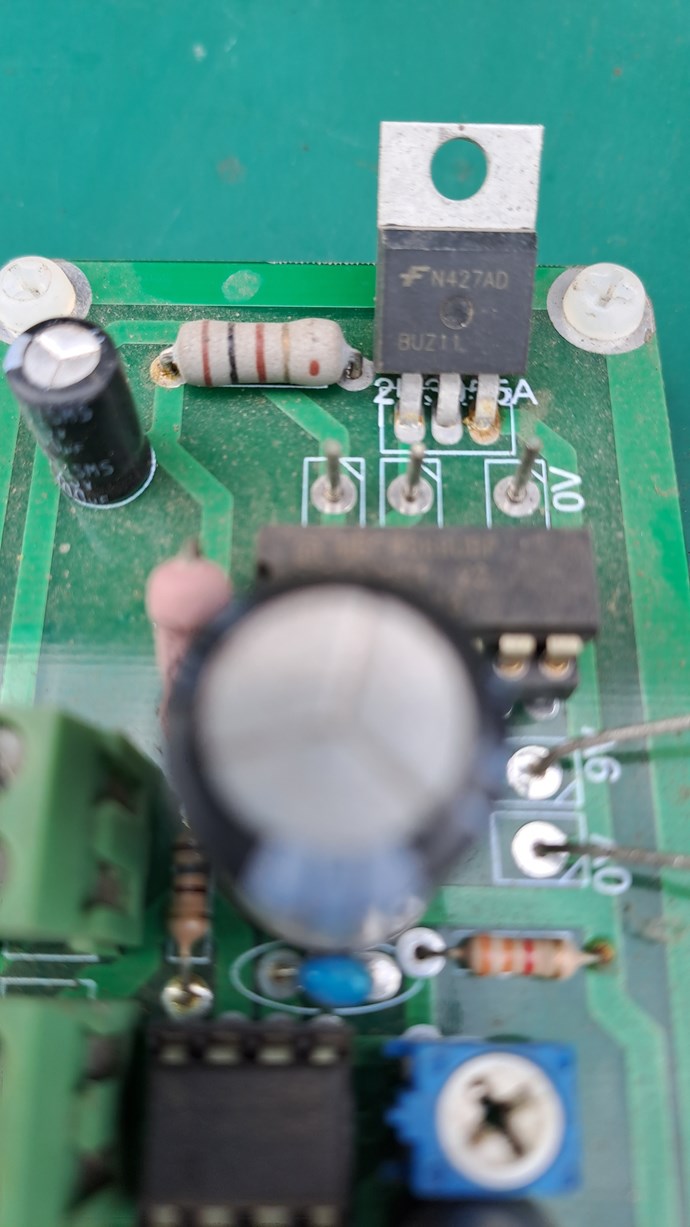
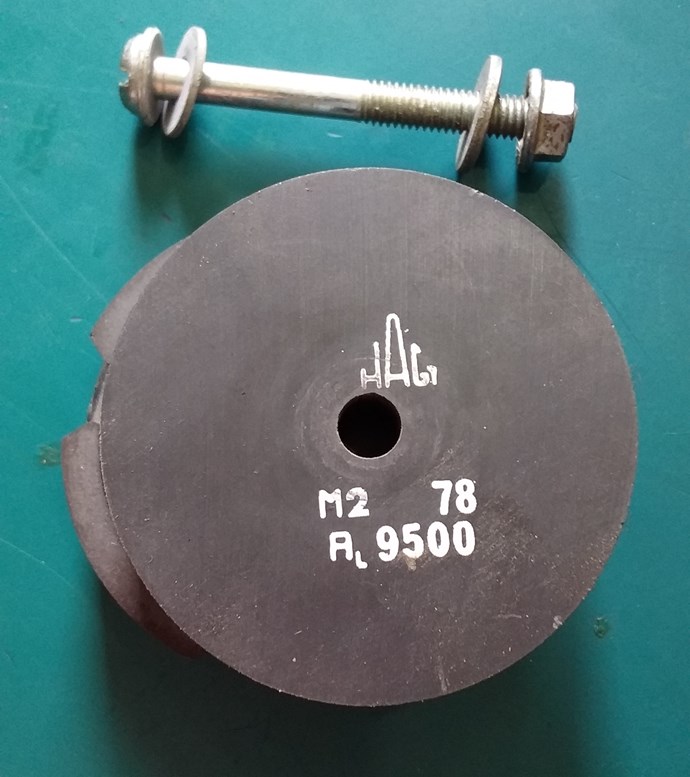
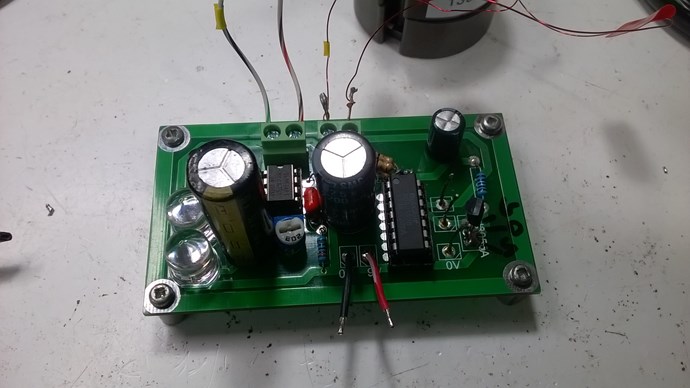
I have a Pot Core, one that you have seen before:


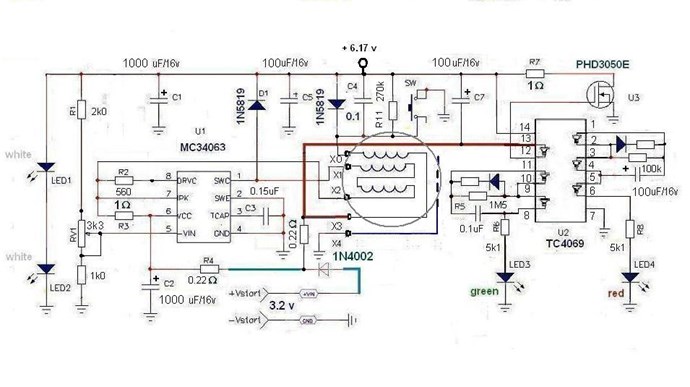
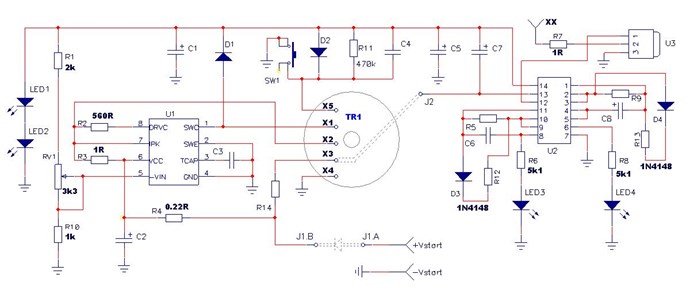
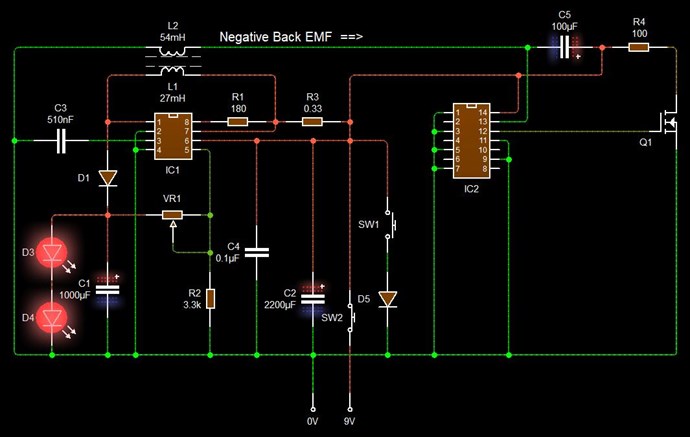
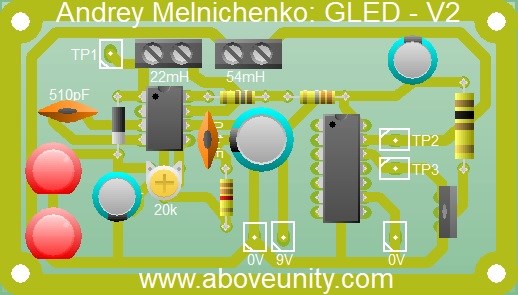
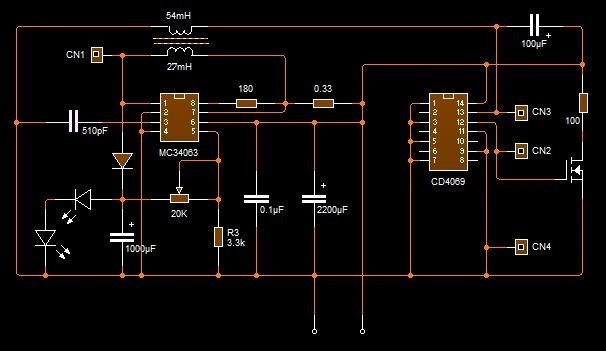
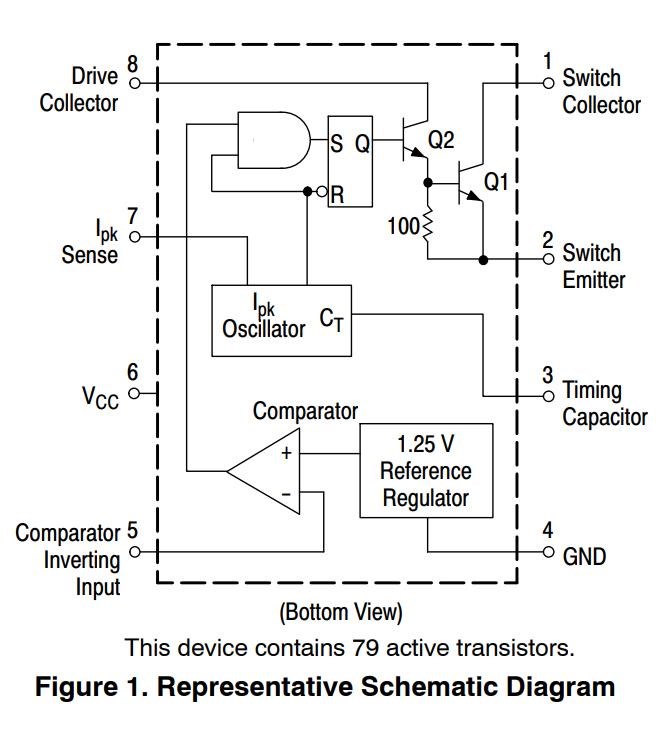
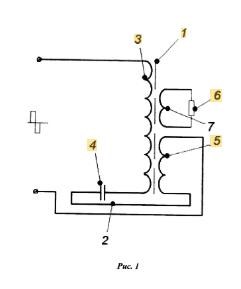
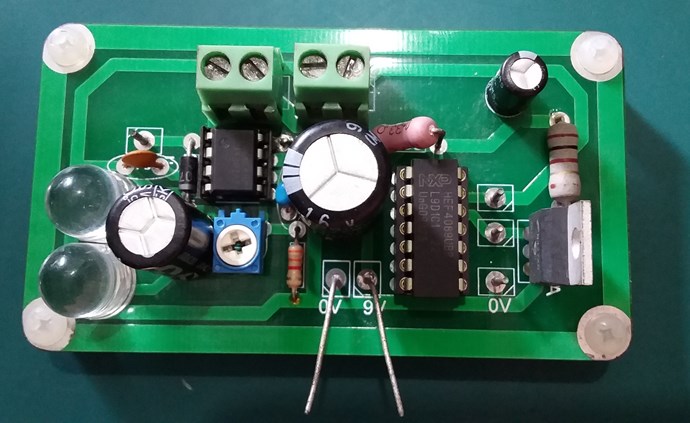
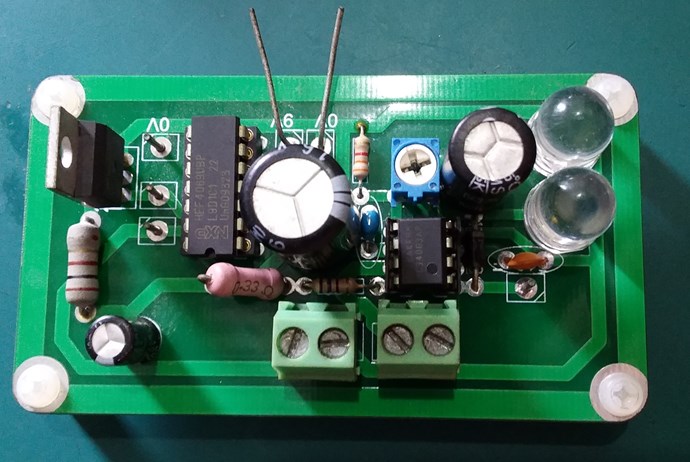
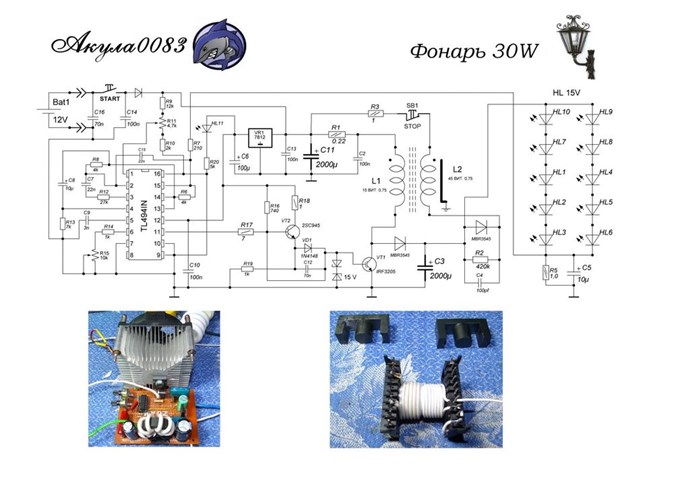
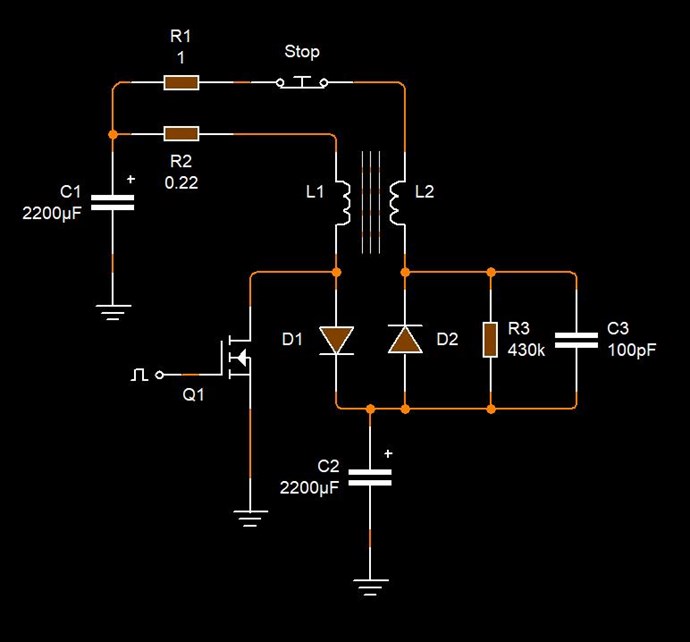
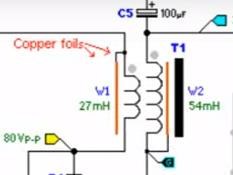
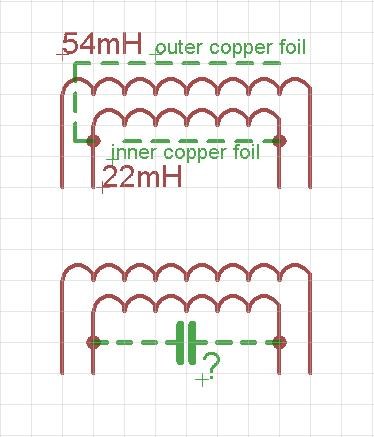
I have drawn the circuit and have the following design:


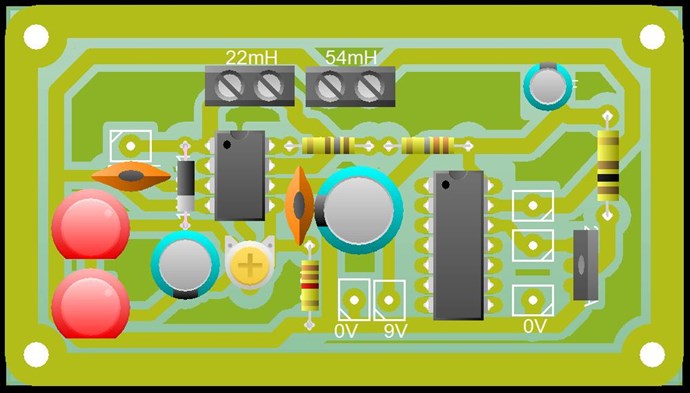
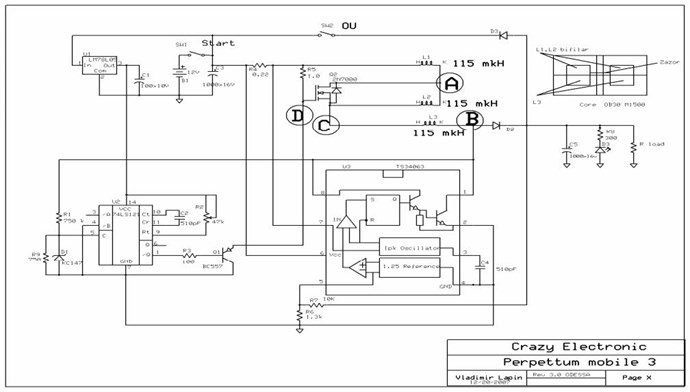
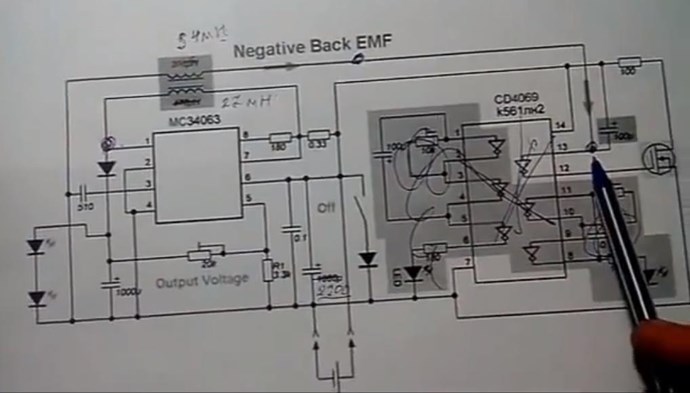
This is just a start. Any changes / improvements will be incorporated and a new circuit may be shown at a later date. This is a copy of Akula's Circuit:


Which was a copy of Andrey Melnichenko's Circuit:


I have replicated this before, on the breadboard. I have had some successes with this circuit, but I thought I would make this a bit more evolved to show others. To try to help others advance! However, I can only do so much, I cant do it all for you! You need to so this for yourself!
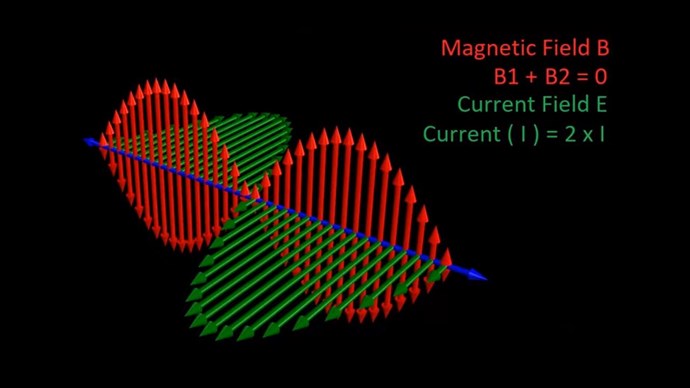
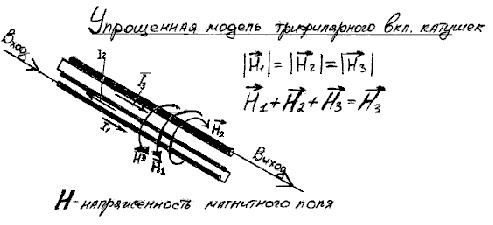
 

Equal and Opposite

I am going to continue harping on about the basics: Equal and Opposite!

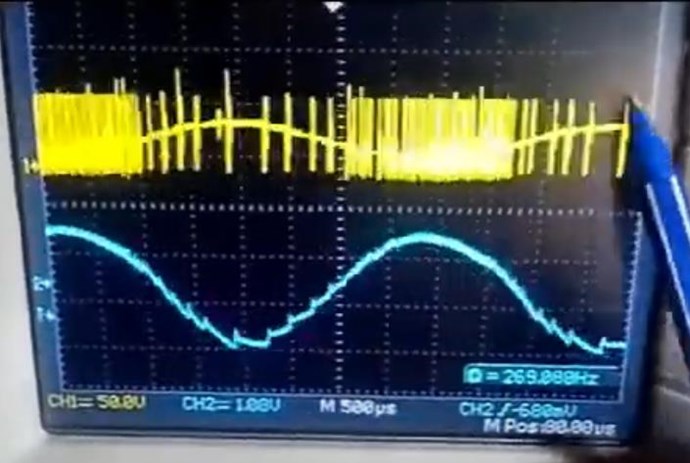
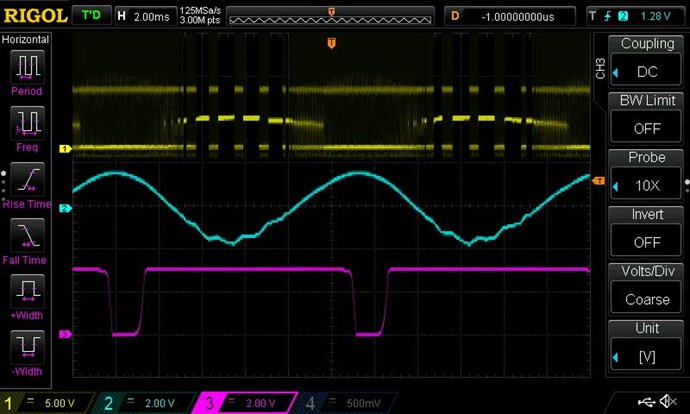
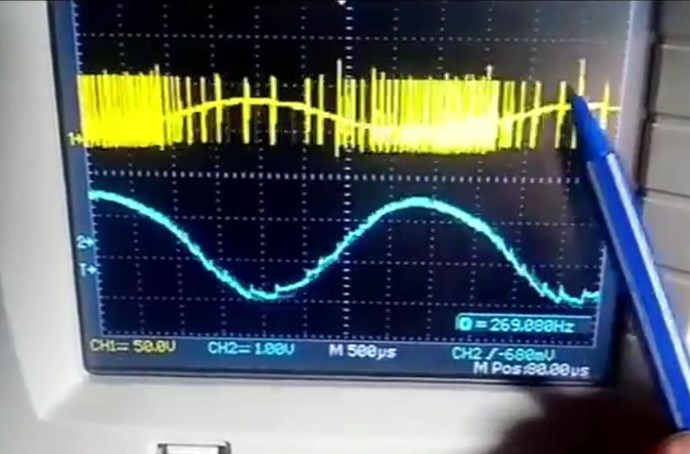
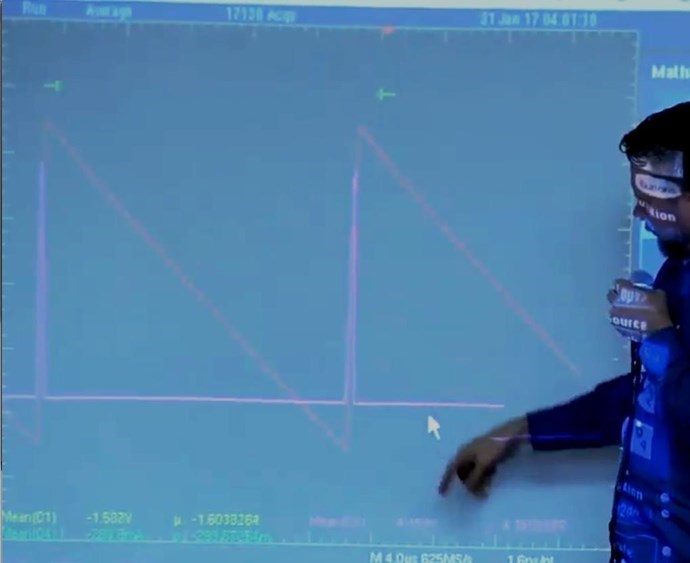
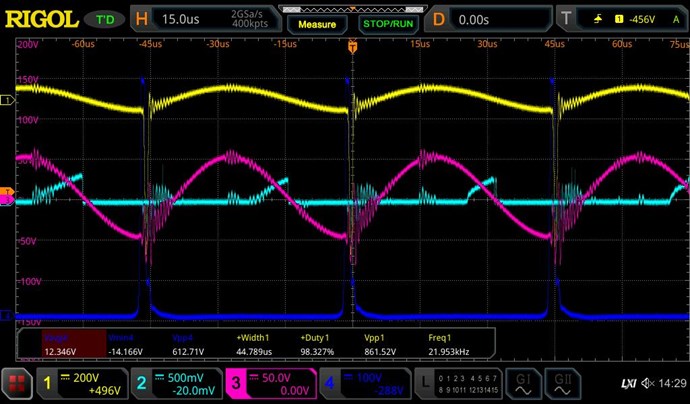
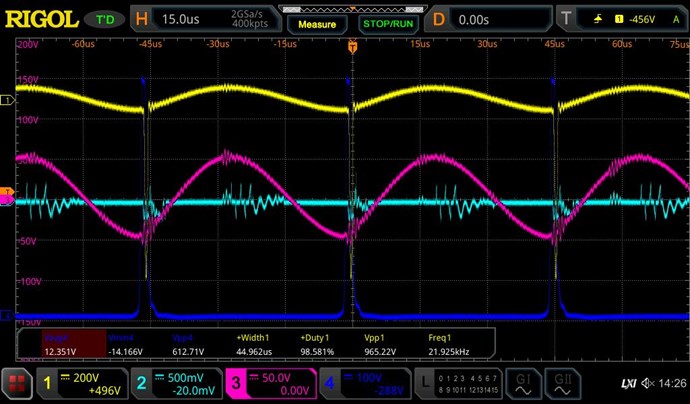
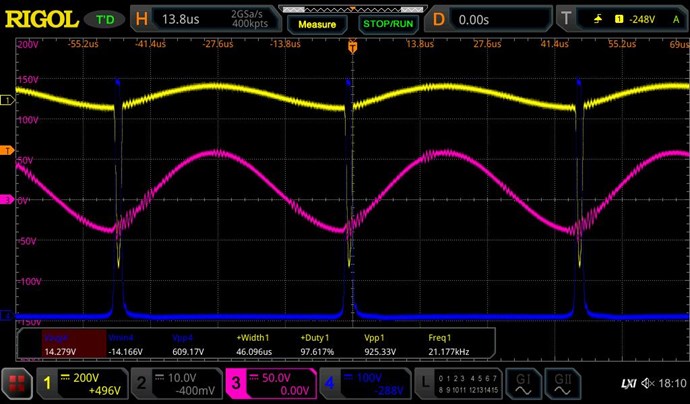
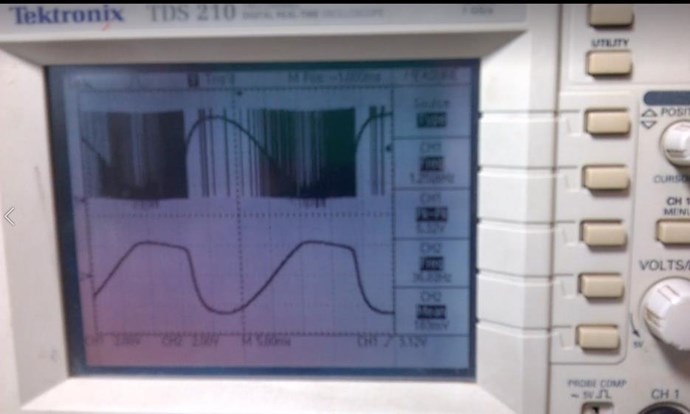
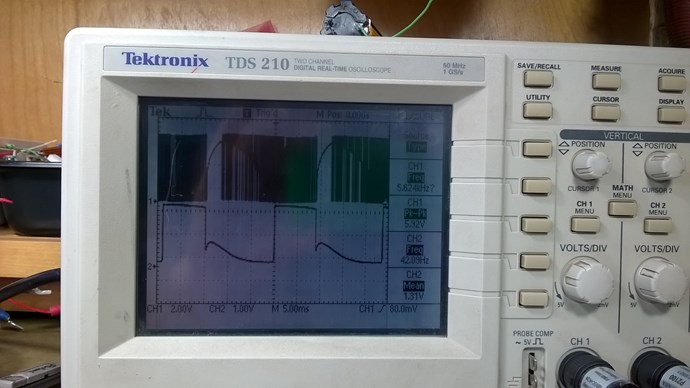
NOTE: The above schematic from Akula, he drew with pen, big dots, above. Each dot is a Test Point, where the Oscilloscope measures the Voltage at each point.

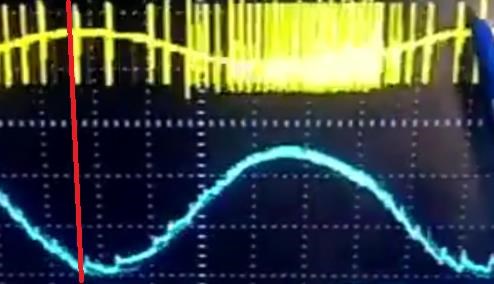
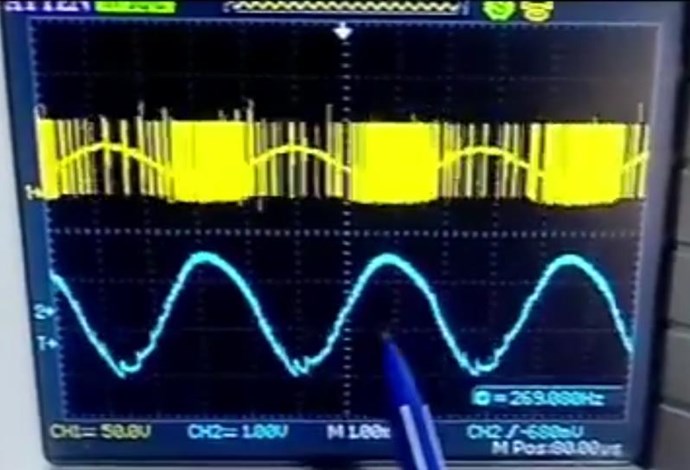
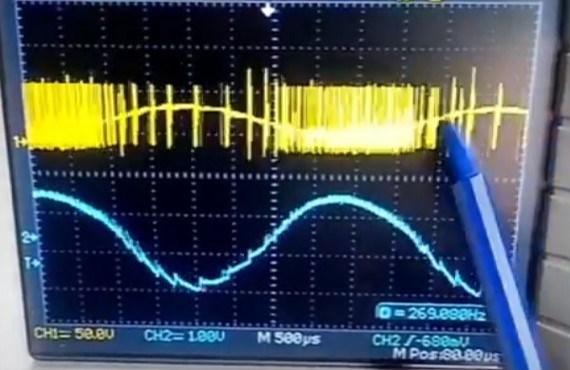
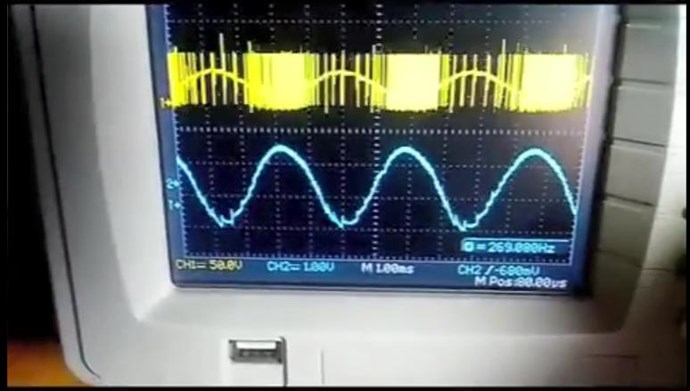
NOTE: The AC Voltage is equal and Opposite:


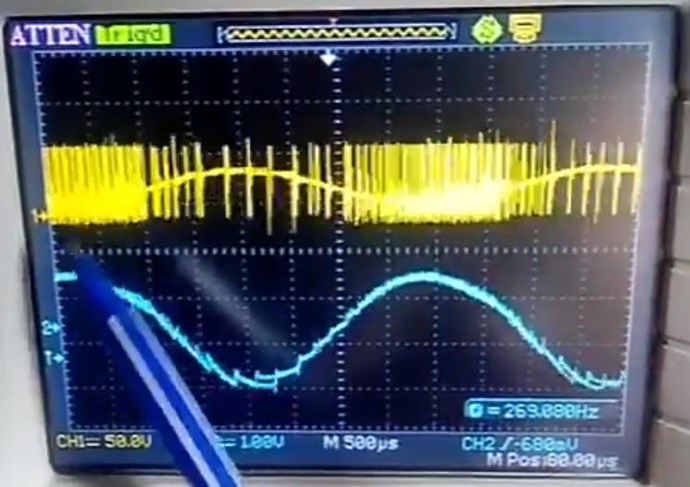
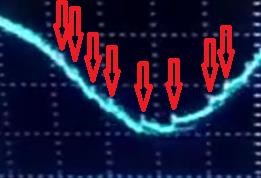
Also Note: The bottom waveform has a goodly degree of DC Offset!
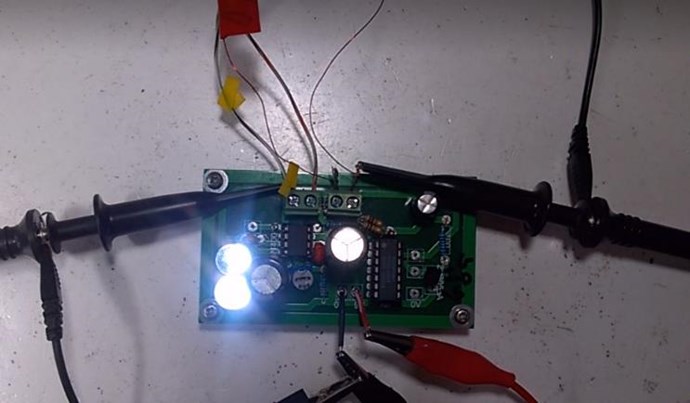
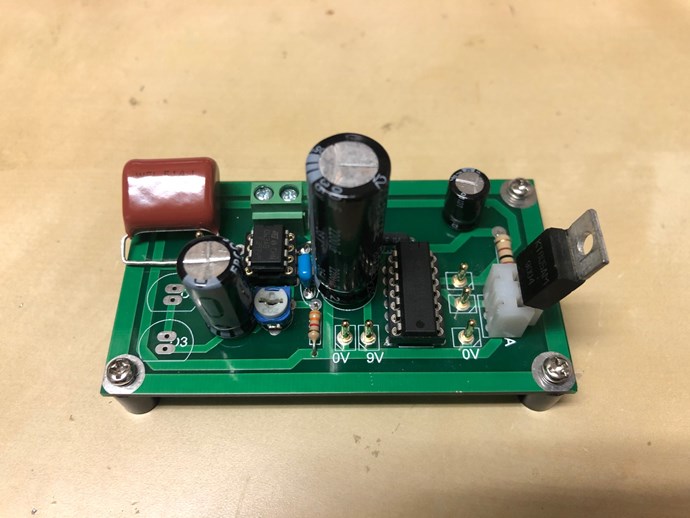
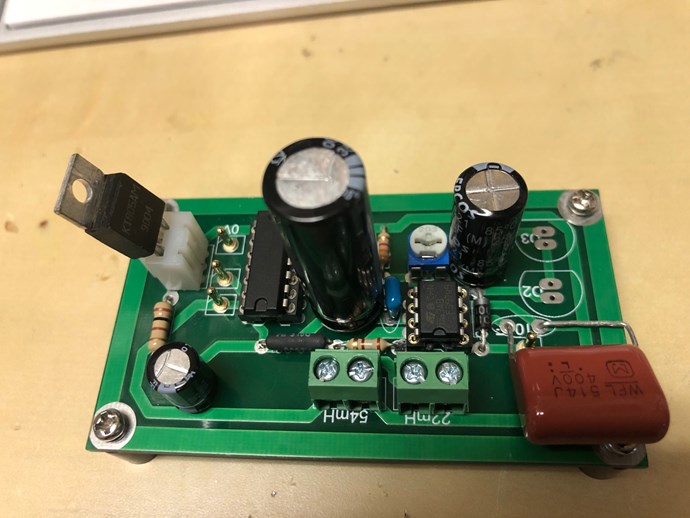
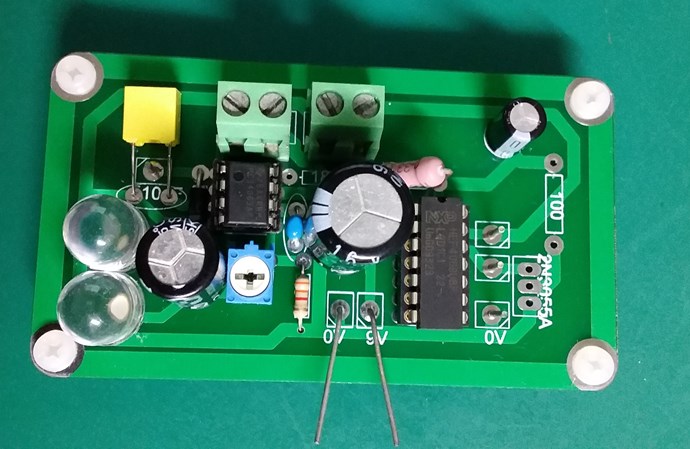
 

PCB Give Away:

I have some PCB's to give away, you pay for postage, from Aus to most parts of the globe its about 8 - 10$. PM Me and I will pick some lucky recipients! Its just a bare bones PCB, you purchase the components and fit as a kit for yourself.

I have most of the components already. I have the PCB's on order and they should be here in a few days.

   Chris

Order By: Standard | Newest | Votes
Chris posted this 12 December 2022

My Friends,

I have already tried to point out, the Key to making this machine work, is right here:


Regarding my Waveform:


I said:

However, its not quite right! I have issues in my Waveform, which for the moment I will not be pointing out.


And, the Issues are, My Asymmetrical Regauging is not right, I have more tuning to do to make sure, I get the Peak Amplitude for the minimum input Pulse via the Cap C3 and the Coils Inductance L1 and L2:


If you guys want to make this work, to Self Run, you need to focus on this very specific area: Asymmetrical Regauging:

Lets observe this image in some detail:


You can see, we have Triangles in the Blue Waveform, clearly seen:


In the Blue Waveform, we see there is a line up of the Spikes, I have marked this in Red. These Triangles are the same as I have pointed out above:


This is where the Coils build up a Potential, this "Generates" Current, the Pump, the Tap is open for a Flow. Currents are Equal and Opposite. Lenz's Law, a Natural State, a state that Nature requires for a System to come back to Equilibrium. A closer look:


Its hard to see in a Sinusoidal System, DC Pulsing is a lot easier to see what's going on.


It should be obvious to any paying attention:

A small, High Frequency, very low Duty Cycle, DC Pulse is timed, to Resonantly Gain Maximum Amplitude on the Coils, Resonant Electromagnetic Induction, REMI, if you like!

This is Asymmetrical Regauging! Resonant Electromagnetic Induction, REMI, is Magnetic Resonance, and also part of Asymmetrical Regauging! All small parts of a very Simple, yet illusive process!

Akula called this Ferro-Resonance. It is not, because this works with a Core and without a Core, so there is no "Ferro" about it!

If you focus specifically, on this very simple area of this device, it will Self Run! You will be Successful!

This is why We are Light Years Ahead of the other Forums!

Best Wishes,

   Chris


If only people would see, and learn these very simple things!


These simple things are very Important! No Power Bill, Imagine that! Imagine not being tied to the Grid, up and go any where you want, and have all the Luxury's in life, no need for the Control mechanisms they use to control you!

I even gave you the PCB:


Many have had differing success with the PCB! However, if you focus on the spikes as I have shown, you will achieve a selfrunning machine!

Best Wishes,

   Chris

Chris posted this 01 December 2022

My Friends,

I have already tried to point out, the Key to making this machine work, is right here:


Regarding my Waveform:


I said:

However, its not quite right! I have issues in my Waveform, which for the moment I will not be pointing out.


And, the Issues are, My Asymmetrical Regauging is not right, I have more tuning to do to make sure, I get the Peak Amplitude for the minimum input Pulse via the Cap C3 and the Coils Inductance L1 and L2:


If you guys want to make this work, to Self Run, you need to focus on this very specific area: Asymmetrical Regauging:

Lets observe this image in some detail:


You can see, we have Triangles in the Blue Waveform, clearly seen:


In the Blue Waveform, we see there is a line up of the Spikes, I have marked this in Red. These Triangles are the same as I have pointed out above:


This is where the Coils build up a Potential, this "Generates" Current, the Pump, the Tap is open for a Flow. Currents are Equal and Opposite. Lenz's Law, a Natural State, a state that Nature requires for a System to come back to Equilibrium. A closer look:


Its hard to see in a Sinusoidal System, DC Pulsing is a lot easier to see what's going on.


It should be obvious to any paying attention:

A small, High Frequency, very low Duty Cycle, DC Pulse is timed, to Resonantly Gain Maximum Amplitude on the Coils, Resonant Electromagnetic Induction, REMI, if you like!

This is Asymmetrical Regauging! Resonant Electromagnetic Induction, REMI, is Magnetic Resonance, and also part of Asymmetrical Regauging! All small parts of a very Simple, yet illusive process!

Akula called this Ferro-Resonance. It is not, because this works with a Core and without a Core, so there is no "Ferro" about it!

If you focus specifically, on this very simple area of this device, it will Self Run! You will be Successful!

This is why We are Light Years Ahead of the other Forums!

Best Wishes,

   Chris

Chris posted this 28 November 2022

Hello Greg,

I used a Buz11, but any will do within spec:


Some may work slightly better than others.

Sorry for the dust!

Best Wishes,

   Chris

greg76 posted this 28 November 2022

Hi Chris, could you post details about the integrated circuits used and about the characteristics of the LEDs?

Thanks.


Hey Fighter,

Yes, of course. this is a basic parts list:


I copied from this circuit:


The MC34063 Datasheet is here. The CD4069 Datasheet is here. Just use any LED's you want, I use 10mm White LED's and shave a little off one side, so they fit to the PCB, I have a very tight fitting PCB designed.

I hope this helps!

Best wishes,

   Chris


Hi Chris,
May I ask what N channel mosfet and diode would you recommend? Also in your PCB it seems that you use a KT806A transistor instead of a mosfet? Is this correct? What would be the reason for this?
Thanks!

Greg

Chris posted this 15 February 2022

My Friends,

Jagau is correct!

Think about it, what do we have here? 

We have exactly, to the T, the exact same effects as The KapaGen, Tariel Kapanadze Generator!

  • Sine Wave Resonance! LCR Push Pull!
  • Spike on the Sine Wave, that triggers Coil Resonance, and thus a Peak Coil Voltage for a given Input. Spark Gap or Nano Pulse!


The base set of Effects are the same!

I too, want to encourrage all to continue in the spirit of Progress! We  have seen very significant Effects and know how this works!

Best Wishes,

   Chris

P.S: Another post Deleted by CD_Sharp, in reply to this post Here, Sadly! What an effort they went to in the End!

Jagau posted this 14 February 2022

Hi all


Andrey Melnichenko has done a lot to share what we could THE MELNICHENKO EFFECT
Chris has given a lot of relevant information to this effect and I would like to continue in the spirit of this thread.
As much as Brian and Islab and of course for anyone who wants to know more, you will find a lot of information here that will help you in the same understanding of the small lamp of Akula on which the Melnichenko effect is based and on understanding coils in partnership.


Jagau

Chris posted this 14 December 2021

Hi Brian and all reading,

I am waiting on a core which Chris has shown to have better results with than what I am achieving so it has been interesting to apply this technique to the various builds and coils and see the results. 


This is really important: These effects are not Core Dependent!

This is entirely an Electrodynamic Effect, Interaction between Coils and Frequencies! This works with no Core, even though my efforts have been more fruitful with a core.

I have tried to say this many times in many places, its a case of using the Coils and their Interactions to find the right, or best, gradient in amplitude of Voltage, Current and Magnetic Field, in other words, Magnetic Resonance, between the interactions.

Do you remember I showed this:

Ref: Chris's Non-Inductive Coil Experiment.


Well, this is part of it, this is where you find the steepest Gradient, or Maximum Rise for Minimum Run, or Maximum Amplitude for a given Interaction. Getting your Voltage Up:


These are the Effects we need to focus on!

Excess Energy comes from the Time Domain!

What I mean by this, is, if we have One Joule of Energy create a Ripple in a Pond, and it takes One Second to Dissipate this One Joule of Energy, but we collected ALL the Ripples, Reflected Ripples, over the course of One Hour, we would get a Gain in Energy in the Time Domain, from all the collected and converted Ripples and Anti Ripple Pairs, all sets of Reflections, occurring over the duration of much greater Time Frame than the initial Ripple!

Another Example, sit two identical Bells besides each other, strike one Bell and observe the other Bell Ring as will yours. Two Bells Ringing by only Striking one! WOW amazing isn't it!

In the Image above, marked as: Important, its just our Single Ripple, then we wait and collect all the Ripples in the Pond. This is our Tap!

More work is done in the System, simply because we have a System that directly interacts with the Quantum World, by its very function. Magnetic Effects are entirely Quantum Mechanical, and all this Brain Washing BS, about Zero Point, Vacuum Energy, Cold Energy and so on, its all just Magnetic Effects on an Observable Level, to the Human Eye, Phenomena! No Fancy BS about it at all! The Electrical "Generator" does this every single Revolution, the Conventional Transformer does this every Cycle, they are simply not catching all the Ripples, they work with only One Ripple, a Symmetrical System, thus Below Unity!

We are building an Asymmetrical System, thus we can go Above Unity!

I see so much pain and upset in the world right now. Change can only come if people bring about this change themselves, and I see many are! Who is going to be left behind?

Best Wishes,

   Chris

Chris posted this 09 December 2021

Hey Brian,

I just use what I have on hand, use what I have avaliable.

I try to use Intuition as much as possible, use your gut, feel your way forward, and look very close to all Detail, no not look past anything that would become important as time goes forward. The small things are the important things!

Three is the Magic Number! This is Asymmetry! Coils doing work to Pump Electrons and force them down the Wire, Accelerating them to Beyond Unity Velocities! 

The current and potential windings require relatively little power, and are applied in such a manner that rate of flow of moving charges may be accelerated beyond 1 Ampere = 6.24 x 10¹⁸ Electrons / Second. Thus the duty factor of the copper changes.

Losses diminish and more charges drawn from the now coherent space field flow at a faster rate as current to the load. This means as more current is required by varying loads more feedback magnetomotive forces free more electrons from binding forces complimented by potential magnetic forces of the orientated, coherent space field. Thus a conductor that formerly had a temperature rise above ambient labelled as a factor of 10 would now operate at a temperature of 1.0. Thus the same gauge wire would carry 10 times more current at the same temperature.


di/dt in L1 must be equal and opposite to di/dt in L2, this is Magnetic Resonance. This is a Standing Wave:


Remember what Floyd Sweet said:

If the directions of the two signals are such that opposite H-fields cancel and E-fields add, an apparently steady E-field will be created. The energy density of the fields remain as calculated above, but the value of the E-field will double from E/2 to E.


Remember, Voltage is either "Generated" or "Un-Generated", polarity matters! Current is Pumped from Source, the Copper Atom, which has 29 Electrons each. The Pump is Partnered Output Coils, Bucking Coils.

Best Wishes,

   Chris

Brian posted this 09 December 2021

Can I ask Chris what is your process to chose the wire diameter you did for your coils?

Kind Regards

Brian

Chris posted this 08 December 2021

Hey Brian,

Yes basically your analogy is pretty good.

Magnetic Resonance is the Standing Wave:

The Mr Preva Experiment is one example of this Standing Wave, worth doing this Experiment.

Voltage Polarity is important, Negative and Voltage is "Un-Generated", Positive Polarity, Voltage is "Generated".

The thread: Electromagnetic Waves is one of many threads that covered this topic. I tried to get people thinking of Current through Wired in the form of Coils / Helix's, have an Electromagnetic Wave associated with it. 

Best Wishes,

   Chris

Brian posted this 08 December 2021

Hi Chris

Can I check my understanding with reference to your video The Secret Revealed - Resonance Magnetically

The timing Cap sets up the frequency of the MC34063 to drive at 45.7KHz, so we want to design our coils for this circuit to reach magnetic resonance at what I might term is the regauge frequency. (which consists of the "regauge" rise time plus the "work region" or fall time for the POC) The regauge section in this case will be about 1/4 wave of the 45.7KHz, but I am not sure how the work region is calculated.

For the sake of calculations if the duty cycle of 10% for Regauge is assumed 1/4 wave of 45.7KHz will have a rise time of 5.47us and work time of 49.23us therefore a frequency of 18.28KHz.

So we are looking for magnetic resonance at 18.28KHz - Is this sound thinking or a wild dream smile

Kind regards

Brian

Chris posted this 07 December 2021

Hey CD,

The Integrated Circuit, IC, MC34063, has a Timing Capacitor on Pin 3, to Ground, that regulates the Timing on the IC's internal Circuitry.


The Value of the Timing Capacitor can be Calculated:

OnOffRatio = (IsStepUp ? ((Vout + Vf - Vin) / (Vin - Vsat)) : ((Vout + Vf) / (Vin - Vsat - Vout)));
Toff = (1.0 / (Freq * 1000.0)) / (OnOffRatio + 1.0);
Ton = (1.0 / (Freq * 1000.0)) - Toff;
Ct = (4.0 * Math.Pow(10, -5.0)) * Ton;


The Timing Capacitor ( Ct ) is a Calculated Value, depending on Frequency and other variables. 45.7KHz is a Rough Guess at a Value for the Frequency with a Timing Capacitor of: 510pF.

I provided the Rough Calculation above, in my second to last post: Here.

The Frequency: 45.7KHz is the small Yellow Spikes seen here:


Best Wishes,

   Chris

Chris posted this 07 December 2021

My Friends,

Jagau is right, for more information: Inductor Design with Magnetics Ferrite Cores

Remember our thread: Non-Linear Inductance, well we explain that Inductance L is intimately linked to the Current I Flow through a Wire, more information is detailed on the above link.

NOTE: The Inductance is important for the proper Resonance on the Sine Wave and Caps C5 and C2. This part must be achieved separately.

This can be turned on its head also:

Which, unless one does some Circuit Analysis, determining the Resonant Frequency of the Caps, Inductor and Timing of the Mosfet Switch, unfortunately means, is not much use.


1. Compute the product of LI² where: 
     L = inductance required with DC bias (millihenries) 
     I = maximum DC output current + 1/2 AC Ripple 


Remember what Floyd Sweet and also Andrey Melnichenko said:

The underlying principal (forget Millikan’s experiment) has been derived in that magnetic effects vary on the square of the current.

Ref: Floyd Sweet - The Space-Flux Coupled Alternator


The main area of research is the study of theoretical and technical possibility of creating devices generate electricity through an open process, the author of a physical transgeneratsii electromagnetic field energy.

The essence of the effect lies in the fact that the addition of electromagnetic fields (constants and variables) are added no energy, and the field amplitude. The field energy is proportional to the square of the amplitude of the total electromagnetic field.

As a result, the simple addition of the energy fields of the total field can be many times the energy of the initial fields separately. This property of the electromagnetic field is non-additivity of the energy field. For example, when added to a stack of three flat circular permanent magnet energy of the total magnetic field is increased to nine times! A similar process occurs with the addition of electromagnetic waves in the feeder lines and resonance systems.

Total energy of a standing electromagnetic wave can be many times greater than the energy of waves and the electromagnetic field to add. As a result, the total energy of the system increases.

Ref: Andrei Melnichenko Inventions


You can see, the same thing is being said: 32 = 9.

So, the question is: Does my Input Coil become Resonant at 45KHz? Or, is there an: L1 to L2 Coil Resonant Interaction, that becomes evident at approximately: 45.7KHz?

This L1 to L2 Interaction is Magnetic Resonance!


Magnetic Resonance is a Standing Electromagnetic Wave!

I found my resonance by trial and error. Yes Hard Work and Effort.

Best Wishes,

   Chris

Attached Files

Jagau posted this 07 December 2021

Thank you for the reference of this potcore with a great AL (9600)

To calculate the turns I use this formula


I use the internal capacity of the 2 coils that makes the system easier.


Jagau

Chris posted this 07 December 2021

My Friends,

"The Trigger" for what I call "The Stairway to Heaven" is the "Duty Cycle" and "Frequency" of Your Input.

Remember: Voltage is either "Generated" or "Un-Generated". We saw this in the Thread: Timing


Seen in the last post, we have a short DC Pulse, in the very narrow Duty Cycle range, and this is The Trigger, explained above, and also seen in the above Triangle as the Voltage Amplitude.

Seen in the above Scope Shot, and shown again here:


My Waveform was not quite right, simply, I did not "Generate" enough Voltage, or I did not quite reach "The Stairway to Heaven"!

I am using this Pot Core:


LARGE size POT (P, PP) ferrite core. AL=9500
Manufactured by HAGY, Hungary.
Bobbin (coil former) is included. The bobbin which I will include is shown on photo #2. Photo #1 shows an old type of bobbin which is no longer available for sale.

Ferrite Size:
Outside Diameter: 47mm (1.85")
Width (of 2 cores = one set): 28mm (1.10")
FOUR slots

Condition - brand NEW, stored in their bulk factory package.

The price is for 1 set (2 halves + bobbin)

Ref: Ebay - P4728 HAGY 47x28mm M2 78 LARGE POT P PP Ferrite Core transformer AL=9500


I recorded my Coils Wire Length and Ratio as:

L1 Primary: 4.7 Meters of 0.6mm wire.
L2 Secondary: 9.85 Meters approx of 0.45mm Wire.
Wire Length Difference = 1 : 2.09574 times.


NOTE:  We saw a calculated Turns Ratio in Akula's GLED of:

Ref: This post Here.


You can see, my Turns Ratio are Higher: 1 : 2

I think I could have taken a few turns off the Primary: L1.

To calculate the Timing Capacitor, we need a frequency of: 45.7KHz. This gives us a Timing Capacitor Value of: 5.105762217359592E-10 Which is: 510pF. Our Capacitor is 510pF.

So, the question is: Does my Input Coil become Resonant at 45KHz? Or, is there an: L1 to L2 Coil Resonant Interaction, that becomes evident at approximately: 45.7KHz?

This L1 to L2 Interaction is Magnetic Resonance!

Best Wishes,

   Chris

Chris posted this 03 December 2021

My Friends,

I pointed out Here, and Here, a significant effect!

See here:

Nice find Miza84!

The Buck Boost circuit is Resonant:


Another Circuit that uses this idea is Andrey Melnichenko, specifically C5 seen here:

Pointed out in this post.


Of course in the above Circuit, the positive Terminal of C5 must be at least enough Voltage to keep the Machine Running, keeping C2 Charged, Current comes from the Magnetic Field Opposition during this part of the Cycle. Which occurs well after the Input is off as we have learned from our work!

Asymmetrical Regauging:


Evidence for these Regauge periods can be seen in the original video, spikes on the bottom of the Sine Wave:


Good spotting! Thanks for sharing!

   Chris


And Here:

My Friends,

This thread is soon becoming one of the most important threads here on this forum.

Time ( t ), time is a critical factor, it is a dependant factor in Electrical Energy; which is defined as Joules ( J ) per second. One Watt Hour ( Wh ) is: Joules ( J ) per second x 3600, because there is 3600 seconds in one hour. So, one Watt Hour ( Wh ) is equal to 3600 Joules ( J )

So, the "Generation" of Energy, is time dependant.

Lets observe this image in some detail:


You can see, we have Triangles in the Blue Waveform, clearly seen:


In the Blue Waveform, we see there is a line up of the Spikes, I have marked this in Red. These Triangles are the same as I have pointed out above:


This is where the Coils build up a Potential, this "Generates" Current, the Pump, the Tap is open for a Flow. Currents are Equal and Opposite. Lenz's Law, a Natural State, a state that Nature requires for a System to come back to Equilibrium. A closer look:


Its hard to see in a Sinusoidal System, DC Pulsing is a lot easier to see what's going on. Lets listen to one example:


Lets look at two examples:

Ref: Tinman ( Bradley Richard Atherton ) - The Rotary Transformer.


Ref: Graham Gunderson - The MIT.


Many times we have seen examples of this Triangle Waveform, its the same as I have described here:


As long as we have a Voltage on the Y Axis, we have a Pump that can Pump Current for the time indicated on the X Axis.

All we need do, is create the Voltage, its Asymmetrical Regauging, described as: 

Ref: Tom Bearden - The Tale of Rajah


Right here we see not just one, but four examples...

   Chris


P.S: Some of my videos have been removed from YouTube and there is no explanation why.


What's wrong with my waveform?

I have not yet, "Caught the Wave", I have not got the correct Regauging going on, You can see I have a little bit:


But it is not enough yet:


NOTE: What we see here, is very similar to the Kapanadze Grenade Coil, or the KappaGen! Its the same Sine Wave with a Spike on the top, instead of One Spike at peak Sine, we have many Spikes on the Sine. The same basic Concepts apply here! I am confident that this phenomena is related to Antenna Theory!

Best Wishes,

   Chris

Chris posted this 20 November 2021

My Friends,

An Image of the Completed Circuit, V 1.0 PCB, shown Here.


Yes, I have fixed a few issues that were seen in the first Image. With the fixes, I got the Waveform Shown:


Where:

  • Yellow is CN1
  • Teal is CN3
  • Pink is CN2


Which is a fairly close approximation to:


Seen in the Video:


However, its not quite right! I have issues in my Waveform, which for the moment I will not be pointing out.

I will share more soon!

Best Wishes,

   Chris

Chris posted this 09 November 2021

My Friends,

For your use: two useful tools:


I am currently Porting to C#, to add to our Aboveunity.com Member Calculator:

namespace AboveunityMemberCalculator.IntegratedCircuits
{


    #region Using Statements:


    using System;


    #endregion


    /// <summary>
    /// 
    /// Datasheet: https://www.onsemi.com/pdf/datasheet/mc34063a-d.pdf
    /// The user must determine the following desired parameters:
    /// Vsat = Saturation voltage of the output switch
    /// VF = Forward voltage drop of the chosen output rectifier
    /// The following power-supply parameters are set by the user:
    /// Vin = Nominal input voltage
    /// Vout = Desired output voltage
    /// Iout = Desired output current
    /// fmin = Minimum desired output switching frequency at the selected values of Vin and Iout
    /// Vripple = Desired peak-to-peak output ripple voltage.The ripple voltage directly affects the line and load
    /// regulation and, thus, must be considered.In practice, the actual capacitor value should be larger than the
    /// calculated value, to account for the capacitor's equivalent series resistance and board layout.
    /// </summary>
    public class MC34063
    {


        #region Fields:


        /// <summary>
        /// If debug, just to test Calculations.
        /// </summary>
        readonly bool debug = true;


        #endregion


        #region Properties:


        /// <summary>
        /// Nominal input voltage.
        /// </summary>
        double Vin { get; set; }


        /// <summary>
        /// Desired output voltage,
        /// |Vout|   1.25 1  R2
        /// </summary>
        double Vout { get; set; }


        /// <summary>
        /// Forward voltage drop of the output rectifier.
        /// </summary>
        double Vf { get; set; }


        /// <summary>
        /// Saturation voltage of the output switch.
        /// </summary>
        double Vsat { get; set; }


        /// <summary>
        /// Frequency in KiloHertz.
        /// </summary>
        double Freq { get; set; }


        /// <summary>
        /// Desired output current
        /// </summary>
        public double Iout { get; set; }


        /// <summary>
        /// Desired peak−to−peak output ripple voltage. In practice, the calculated capacitor value will need to be increased due to its
        /// equivalent series resistance and board layout.The ripple voltage should be kept to a low value since it will directly affect the
        /// line and load regulation.
        /// </summary>
        double Vripple { get; set; }


        #endregion


        /// <summary>
        /// The MC34063 StepUp Converter Equations.
        /// Code POrted from: https://observablehq.com/@sharow/mc34063-step-up-step-down-calculator
        /// </summary>
        /// <param name="Vin">Nominal Input Voltage</param>
        /// <param name="Vout">Desired output voltage</param>
        /// <param name="Vf">Forward Voltage drop of output diode</param>
        /// <param name="Vsat">Saturation Voltage of output Switch (Vsat of Internal Switch is 1.0V typ, 1.3V max)</param>
        /// <param name="Freq">Minimum desired output switching frequency at selected Vin/Vout.</param>
        /// <param name="Iout">Desired output current</param>
        /// <param name="Vripple">Desired peak-to-peak ripple voltage</param>
        public void StepUpConverter(double Vin, double Vout, double Vf, double Vsat, double Freq, double Iout, double Vripple)
        {

            // Test Input Values:
            if (debug)
            {
                Vin = 5.0;
                Vout = 10.0;
                Vf = 0.6;
                Vsat = 1.0;
                Freq = 20.0;
                Iout = 0.25;
                Vripple = 0.25;
            }

            // Calculations:
            Result Result = new Result();
            bool IsStepUp = (Vout > Vin);
            Result.OnOffRatio = (IsStepUp ? ((Vout + Vf - Vin) / (Vin - Vsat)) : ((Vout + Vf) / (Vin - Vsat - Vout)));
            Result.Toff = (1.0 / (Freq * 1000)) / (Result.OnOffRatio + 1);
            Result.Ton = (1.0 / (Freq * 1000)) - Result.Toff;
            Result.Ct = (4 * Math.Pow(10, -5)) * Result.Ton;
            Result.Ipk = (IsStepUp ? (2 * Iout * (Result.Ton / Result.Toff + 1)) : 2 * Iout);
            Result.Inductance = (IsStepUp ? ((Vin - Vsat) / Result.Ipk) * Result.Ton : ((Vin - Vsat - Vout) / Result.Ipk) * Result.Ton);
            Result.Rsc = 0.3 / Result.Ipk;
            Result.Co = (IsStepUp ? ((Iout * Result.Ton) / Vripple) : (Result.Ipk * (Result.Ton + Result.Toff) / (8 * Vripple)));


            /*
            ${tex`V_{in}`} = ${vin} V  ,  ${tex`V_{out}`} = ${vout} V ${is_step_up ? "|Step-Up" : "|Step-Down"}
            ${tex`V_{f}`} = ${vf} V  ,  ${tex`V_{sat}`} = ${vsat} V
            ${tex`freq`} = ${freq} kHz
            ${tex`I_{out}`} = ${iout} A
            ${tex`V_{ripple}`} = ${vripple} V  \ (${round(vripple/Math.abs(vout) * 100, 1)}% of ${tex`V_{out}`})
            ----
            ${(toff<=0)?' <span style="color:red">!!! Vin / Vout too close !!!</span>':''}
            ${tex`R_{sc}`} = ${round(rsc, 3)}  Ohm
            ${tex`t_{on}`} = ${round(ton*1e6,3)} us ,\  ${tex`t_{off}`} = ${round(toff*1e6,3)} us <br>
            ${tex`Duty-ratio`} = ${round(ton/(ton+toff), 2)}
            ${tex`I_{peak}`} = ${round(ipk, 3)} A ${(ipk>1.5) ? '<span style="color:red">!!!</span>(consider external switch)' : ''}
            ${tex`C_{T}`} = ${round(ct*1e12, 0)} pF
            ${tex`L_{min}`} = ${round(inductance*1e6, 1)}  uH
            ${tex`C_{o}`} = ${round(co*1e6, 0)} uF
            ${tex`PowerDissipation_{diode}`} = ${round(vf * iout, 3)} W
            ${tex`PowerDissipation_{switch}`} = ${round(vsat * iout, 3)} W

            GIVES:

            Vin = 5 V , V_{out}Vout = 10 V |Step-Up
            V_{f}Vf = 0.6 V , V_{sat}Vsat = 1 V
            freqfreq = 20 kHz
            I_{out}Iout = 0.25 A
            V_{ripple}Vripple = 0.25 V (2.5% of V_{out}Vout)
            R_{sc}Rsc = 0.25 Ohm
            t_{on}ton = 29.167 us , t_{off}toff = 20.833 us
            Duty-ratioDuty−ratio = 0.58
            I_{peak}Ipeak = 1.2 A
            C_{T}CT = 1167 pF
            L_{min}Lmin = 97.2 uH
            C_{o}Co = 29 uF
            PowerDissipation_{diode}PowerDissipation diode = 0.15 W
            PowerDissipation_{switch}PowerDissipation switch = 0.25 W
            */
        }


        /// <summary>
        /// The MC34063 StepUp Converter Equations.
        /// Code POrted from: https://observablehq.com/@sharow/mc34063-step-up-step-down-calculator
        /// </summary>
        /// <param name="Vin">Nominal Input Voltage</param>
        /// <param name="Vout">Desired output voltage</param>
        /// <param name="Vf">Forward Voltage drop of output diode</param>
        /// <param name="Vsat">Saturation Voltage of output Switch (Vsat of Internal Switch is 1.0V typ, 1.3V max)</param>
        /// <param name="Freq">Minimum desired output switching frequency at selected Vin/Vout.</param>
        /// <param name="Iout">Desired output current</param>
        /// <param name="Vripple">Desired peak-to-peak ripple voltage</param>
        public void StepDownConverter(double Vin, double Vout, double Vf, double Vsat, double Freq, double Iout, double Vripple)
        {

            // Test Input Values:
            if (debug)
            {
                Vin = 5.0;
                Vout = 3.0;
                Vf = 0.6;
                Vsat = 1.0;
                Freq = 20.0;
                Iout = 0.25;
                Vripple = 0.25;
            }

            // Calculations:
            Result Result = new Result();
            bool IsStepUp = (Vout > Vin);
            Result.OnOffRatio = (IsStepUp ? ((Vout + Vf - Vin) / (Vin - Vsat)) : ((Vout + Vf) / (Vin - Vsat - Vout)));
            Result.Toff = (1.0 / (Freq * 1000)) / (Result.OnOffRatio + 1);
            Result.Ton = (1.0 / (Freq * 1000)) - Result.Toff;
            Result.Ct = (4 * Math.Pow(10, -5)) * Result.Ton;
            Result.Ipk = (IsStepUp ? (2 * Iout * (Result.Ton / Result.Toff + 1)) : 2 * Iout);
            Result.Inductance = (IsStepUp ? ((Vin - Vsat) / Result.Ipk) * Result.Ton : ((Vin - Vsat - Vout) / Result.Ipk) * Result.Ton);
            Result.Rsc = 0.3 / Result.Ipk;
            Result.Co = (IsStepUp ? ((Iout * Result.Ton) / Vripple) : (Result.Ipk * (Result.Ton + Result.Toff) / (8 * Vripple)));


            /*
            ${tex`V_{in}`} = ${vin} V  ,  ${tex`V_{out}`} = ${vout} V ${is_step_up ? "|Step-Up" : "|Step-Down"}
            ${tex`V_{f}`} = ${vf} V  ,  ${tex`V_{sat}`} = ${vsat} V
            ${tex`freq`} = ${freq} kHz
            ${tex`I_{out}`} = ${iout} A
            ${tex`V_{ripple}`} = ${vripple} V  \ (${round(vripple/Math.abs(vout) * 100, 1)}% of ${tex`V_{out}`})
            ----
            ${(toff<=0)?' <span style="color:red">!!! Vin / Vout too close !!!</span>':''}
            ${tex`R_{sc}`} = ${round(rsc, 3)}  Ohm
            ${tex`t_{on}`} = ${round(ton*1e6,3)} us ,\  ${tex`t_{off}`} = ${round(toff*1e6,3)} us <br>
            ${tex`Duty-ratio`} = ${round(ton/(ton+toff), 2)}
            ${tex`I_{peak}`} = ${round(ipk, 3)} A ${(ipk>1.5) ? '<span style="color:red">!!!</span>(consider external switch)' : ''}
            ${tex`C_{T}`} = ${round(ct*1e12, 0)} pF
            ${tex`L_{min}`} = ${round(inductance*1e6, 1)}  uH
            ${tex`C_{o}`} = ${round(co*1e6, 0)} uF
            ${tex`PowerDissipation_{diode}`} = ${round(vf * iout, 3)} W
            ${tex`PowerDissipation_{switch}`} = ${round(vsat * iout, 3)} W

            GIVES:

            Vin = 5 V , V_{out}Vout = 3 V |Step-Down
            V_{f}V f = 0.6 V , V_{sat}Vsat = 1 V
            freqfreq = 20 kHz
            I_{out}Iout = 0.25 A
            V_{ripple}Vripple = 0.25 V (8.3% of V_{out}Vout)
            R_{sc}Rsc = 0.6 Ohm
            t_{on}ton = 39.13 us , t_{off}toff = 10.87 us
            Duty-ratioDuty−ratio = 0.78
            I_{peak}Ipeak = 0.5 A
            C_{T}CT = 1565 pF
            L_{min}Lmin = 78.3 uH
            C_{o}Co = 13 uF

            PowerDissipation_{diode}PowerDissipation diode = 0.15 W
            PowerDissipation_{switch}PowerDissipation switch = 0.25 W
            */
        }


        /// <summary>
        /// The MC34063 StepUp Converter Equations.
        /// Code POrted from: https://observablehq.com/@sharow/mc34063-inverting-conveter-calculator
        /// </summary>
        /// <param name="Vin">Nominal Input Voltage</param>
        /// <param name="Vout">Desired output voltage</param>
        /// <param name="Vf">Forward Voltage drop of output diode</param>
        /// <param name="Vsat">Saturation Voltage of output Switch (Vsat of Internal Switch is 1.0V typ, 1.3V max)</param>
        /// <param name="Freq">Minimum desired output switching frequency at selected Vin/Vout.</param>
        /// <param name="Iout">Desired output current</param>
        /// <param name="Vripple">Desired peak-to-peak ripple voltage</param>
        public void VoltageInvertingConverter(double Vin, double Vout, double Vf, double Vsat, double Freq, double Iout, double Vripple)
        {

            // Test Input Values:
            if (debug)
            {
                Vin = 5.0;
                Vout = -5.0;
                Vf = 0.6;
                Vsat = 1.0;
                Freq = 20.0;
                Iout = 0.25;
                Vripple = 0.1;
            }

            // Calculations:
            Result Result = new Result();
            Result.OnOffRatio = (Math.Abs(Vout) + Vf) / (Vin - Vsat);
            Result.Toff = (1.0 / (Freq * 1000)) / (Result.OnOffRatio + 1);
            Result.Ton = (1.0 / (Freq * 1000)) - Result.Toff;
            Result.Ct = (4 * Math.Pow(10, -5)) * Result.Ton;
            Result.Ipk = 2 * Iout * (Result.Ton / Result.Toff + 1);
            Result.Inductance = ((Vin - Vsat) / Result.Ipk) * Result.Ton;
            Result.Rsc = 0.3 / Result.Ipk;


            /*
            ${tex`V_{in}`} = ${vin} V  ,  ${tex`V_{out}`} = ${vout} V
            ${tex`V_{f}`} = ${vf} V  ,  ${tex`V_{sat}`} = ${vsat} V
            ${tex`freq`} = ${freq} kHz
            ${tex`I_{out}`} = ${iout} A
            ${tex`V_{ripple}`} = ${vripple} V  \ (${round(vripple/Math.abs(vout) * 100, 1)}% of ${tex`V_{out}`})
            ----

            ${tex`R_{sc}`} = ${round(rsc, 3)}  Ohm
            ${tex`t_{on}`} = ${round(ton*1e6,3)} us ,\  ${tex`t_{off}`} = ${round(toff*1e6,3)} us <br>
            ${tex`Duty-ratio`} = ${round(ton/(ton+toff), 2)}
            ${tex`I_{peak}`} = ${round(ipk, 3)} A ${(ipk>1.5) ? '<span style="color:red">!!!</span>(consider external switch)' : ''}
            ${tex`C_{T}`} = ${round(ct*1e12, 0)} pF
            ${tex`L_{min}`} = ${round(inductance*1e6, 1)}  uH
            ${tex`C_{o}`} = ${round(((iout * ton) / vripple)*1e6, 0)} uF
            ${tex`PowerDissipation_{diode}`} = ${round(vf * iout, 3)} W
            ${tex`PowerDissipation_{switch}`} = ${round(vsat * iout, 3)} W

            GIVES:

            Vin = 5 V , V_{out}Vout = -5 V
            V_{f}Vf = 0.6 V , V_{sat}Vsat = 1 V
            freqfreq = 20 kHz
            I_{out}Iout = 0.25 A
            V_{ripple}Vripple = 0.1 V (2% of V_{out}Vout)
            R_{sc}Rsc = 0.25 Ohm
            t_{on}ton = 29.167 us , t_{off}toff = 20.833 us
            Duty-ratioDuty−ratio = 0.58
            I_{peak}Ipeak = 1.2 A
            C_{T}CT = 1167 pF
            L_{min}Lmin = 97.2 uH
            C_{o}Co = 73 uF
            PowerDissipation_{diode}PowerDissipation diode = 0.15 W
            PowerDissipation_{switch}PowerDissipation switch = 0.25 W
            */
        }


        /// <summary>
        /// The MC34063 Calculated Results Class.
        /// </summary>
        public class Result
        {


            #region Fields:


            #endregion


            #region Properties:


            /// <summary>
            /// Duty-ratio = ton / ( ton + toff )
            /// </summary>
            public double OnOffRatio { get; set; }


            /// <summary>
            /// Input Current Peak. If ipk > 1.5 consider external switch!
            /// </summary>
            public double Ipk { get; set; }


            /// <summary>
            /// Desired output current in Amperes
            /// </summary>
            public double Iout { get; set; }


            /// <summary>
            /// Time On = ton * 1e6 in us
            /// </summary>
            public double Ton { get; set; }


            /// <summary>
            /// Time Off = toff * 1e6 in us
            /// </summary>
            public double Toff { get; set; }


            /// <summary>
            /// The Timing Capacitor in pF = ct * 1e12
            /// </summary>
            public double Ct { get; set; }


            /// <summary>
            /// The Coils Inductance in uH: inductance * 1e6
            /// </summary>
            public double Inductance { get; set; }


            /// <summary>
            /// Rsc Resistor Source Current in Ohms
            /// </summary>
            public double Rsc { get; set; }


            /// <summary>
            /// Capacitor Output, the Storage Capacitor.
            /// </summary>
            public double Co { get; set; }


            #endregion


            /// <summary>
            /// CTOR
            /// </summary>
            public Result()
            {
            }
        }
    }
}


Best Wishes,

   Chris

Chris posted this 05 November 2021

My Friends,

From:


Akula's GELD Waveform:


Little more work:


Where:

  • Yellow is CN1
  • Teal is CN3
  • Pink is CN2


I would like to note; 2x other circuit's I posted on this thread with the right Capacitance on the 510pF Cap.  

Best Wishes,

   Chris

Chris posted this 03 November 2021

Hi Amin,

A little bit of video in the first post, posted again here:


I spent a lot of time on this circuit, tearing down and rebuilding, looking back now, my documentation was poor, I did not document enough, and did not document enough of the right things!

I think it is important to document every experiment! Circuit, Scopeshots, Test Points, Scope Channels, Pictures, everything you can, that way, later, when you need to return to review information, you can easily!

I started a thread: The Importance of Documentation and Understanding!

Although these last images are old, many years old, they were a good step forward for me! I learned a lot! I remember when I saw the waveform Akula showed us and thinking wow, I am nearly there, and then...

I did this work, in and around this work: Here

Best Wishes,

   Chris

Amin posted this 03 November 2021

Hello Chris and Friends,

Good job and news, I'm happy to see it is work.
is it possible to show some video of this job?

That is interest for me because it is working with small core like TV core.

Best Wishes,

Amin

Chris posted this 03 November 2021

My Friends,

Here some images of my old experiments on this circuit:


With this circuit, I did get it to run, I think I said that already, I spent a lot of time on this to see results!

I did this work, in and around this work: Here

Best Wishes,

   Chris

Chris posted this 02 November 2021

My Friends,

From Brians Thread on the Eternal Flashlight, Some good investigative work by YoElMiCrO:

Hello everyone.

First of all apologize for not being active
for a long time, work issues because
these are difficult times.

Chris the capacitor value is wrong, it is not 510nF is 510pF
since it determines the maximum time for Ton.
Ton=(C/0.00004).
The MC34063 is a hysterical DC/DC converter,
this means that you can vary the two times Ton/Toff and by
consequently their frequency of work.
The maximum duty it is capable of generating is approximately
85%, ton duration is controlled by the control loop and current
that senses between the pins 6/7 through the series resistor.
This current is determined by the voltage drop between these terminals and
is about 0.33V.

That is why their waveforms have nothing to do with the replications made.
Brian, it is the capacitor of 100uF that when it is at its maximum negative if
it is placed in parallel to the input capacitor this recharges it.
It is more complex than what I expose here, but it is a good approximation.

Thank you.

YoElMiCrO.


My Reply:

Thank you YoElMiCrO!

Nice Catch, I will correct my Circuits first up in the morning!

Best Wishes,

   Chris


Please beware the Value of the 510 Cap should be pf and not nf, this is my error and I am in the process of fixing this thread, it will be done today! Circuits and diagrams will be fixed asap!

I am sorry for this simple error! Please everyone, if you see an error, please point it out, I do very much strive to bring the best and most accurate information I can at all times, however the best of us still make mistakes. embarassed

Best Wishes,

   Chris


EDIT: I have changed all Images with the correct Value, please refresh, it may take a few refreshed pages to get the updated Images, because they Cache in your browser.

P.S: 13 February 2020, its taken almost 2 years to pick up this error! Damn! Researchers Unite, help spot any silly mistakes like this one!

baerndorfer posted this 09 October 2021

in the next step i did a measurment of the current which is happening on both legs of the secondary POC coil.

i did the measurement with a 10mOhm shunt and use a differential probe to get the corresponding voltage drop. the shunt is placed after the diode. we see the current-probe on CH2 in cyan

for some reason the current is very late when i compare it with the voltage in yellow (CH1 voltage, leg1 from POC)

the other leg from POC (CH3 voltage) looks different.

so we have the situation, that both legs from this POC-setup do different things.

i think this is what don smith mentioned in his teachings. one leg is for the voltage - the other is for current.

regards!

to prevent confusion i like to add the video where A. Melnichenko shows his finding and demo circuit.  https://odysee.com/@tankcircuit:a/AndreyMelnichenko:b?r=HNY9ETVr7GutyjQY7FZRkJ6rMDrCLsLr

baerndorfer posted this 08 October 2021

in the last weeks i did a couple of experiments with 2 e-cores and the information that i found from Andrej Melnichenkos. in his basic-circuit he uses 2 e-cores and 2 ordinary wingings on it - i think you know his scematic.

as usual i tried poc-coil on the secondary e-core and a ordinary one for the primary.

i energize the coil on the primary with a pulse-circuit. the switching is low-side.

i monitor the pulse from primary (CH4) and leg1 (CH1) from the secondary which is POC.

this is what i find...

as we can see the Vpp of the energizing pulse is 605V (CH4 - blue)

the reaction from secondary is 920Vpp - and it goes into the minus region

CH3 is the other leg from POC coil. it has no spike - just looks nice.

hope this information is helpful for someone.

regards!

Chris posted this 03 October 2021

My Friends,

We have covered some of this before, but not in much detail. Today I want to take a closer look at the IC: MC34063:


Observing closely, the Circuits:


Or if you prefer:


We can see a very clear and present similarity to another Circuit we know very well:

Yes, Akula did use the exact same technique, just using slightly different Circuitry, I am specifically referring to this part of the Circuit:

We referred to this Here.


This Circuit, only when in Resonance, Frees and Pumps Electrons from the Copper Atoms, many billions of them, because the Coils Buck each other.

Remember: The Mosfet is simply a Switch, that's all! only 4 or so parameters can be adjusted:

  1. Frequency
  2. Duty Cycle
  3. Rise Time
  4. Decay Time


All of which Akula referred to in his Video here:


Now, the logic here, if one follows the schematics, is, we have this occurring:


Bucking Coils, where the Current in one Coil is opposing, directly, the other Coils, exactly as Andrey Melnichenko told us all along!

Akula copied Andrey Melnichenko's work directly, and Steho Energy already had Andrey Melnichenko's work, seen here:


The person in the video, I believe is: Arthur Tränkle, CEO of Steho Energy, and ironically, they also took Akula's work and shelved it also. Here is Arthur Tränkle, CEO of Steho Energy, at Akula's house, making a demonstration of Akula's work:


Seen Here:


and also here:


Please see Here:

Free Energy Device - 1 Watt Akula TPU Dismantling - no hidden batteries

In this video Akula shows exactly, how the coils are build on the plastic core as he dismantles it to show that there no hidden batteries.
The Akula TPU runs on tapping the magnetic field of the earth.
In this moment this device is putting out about 1 Watt of free power.
As it depends on the location of the earth magnetic field these coils need to be adapted to the location for the maximum output. At his home in Russia he gets already more output, but as he stays in Germany during taping of this video, there was less output there, cause the magnetic fields from the earth are a bit different there. (different resonance frequencies)
This TPU did also run in an underground bunker wrapped in Aluminiumfoil !
So you have it... no hidden batteries and the coil structure is shown.
Many thanks to Akula and Arthur Tränkle for releasing this video to the public.
Regards, Stefan.


My Friends, a bit of a history lesson at the same time I guess? 

Arthur Tränkle is a connected sort of guy:


Hmm, did we see Arnold Schwarzenegger with a Boot on?


Hiding:


Wow, I can ramble! But for those that did not know, now they do! Arnold is one of many hundreds!

My Friends, Bucking Coils can produce Huge Power Gains, if one just takes the time and works with them properly, and smartly, because some are just totally silly about this! We have shown you how to do it, focus, concentrate, get your Voltage Up and Current through the same Resistance will go up linearly!

Monitor your Currents, and you will see results!

Best Wishes,

   Chris

Brian posted this 30 September 2021

Many Thanks Chris

Brian

  • Liked by
  • Chris
Chris posted this 29 September 2021

Hey Brian and anyone else interested,

I have the old files, but they are incomplete as I started drawing up a slightly improved version of the Circuit: V2.0

The Files are attached.

Here is the Circuit, basically the same:


You can see, the circuit is basically the same, only giving the LED's more room and also: C4, the 510nF Cap more room.

Zip File is attached below. Remember, you need to specify when ordering:

Dimensions: Xmm x Ymm

File: .gb0 -  Board outline layer

File: .gb1 -  Bottom copper (solder side) layer

File: .gb2 - Top copper (component side) layer

File: .gb3 - Bottom (solder side) solder mask layer

File: .gb4 - Top (component side) solder mask layer

File: .gb5 - Silk screen (component outline) layer


Best Wishes, and Enjoy,

   Chris

Attached Files

Chris posted this 28 September 2021

Hi Brian,

Having trouble locating the files. Will search Backups and let you know.

Best Wishes,

   Chris

Brian posted this 26 September 2021

Hi Team

I am working on this GLED build and thought while I was waiting on some suitable cores would also order some boards from JLC. Would any one happen to have a copy of the cwz files for the above board design they are willing to share? I will have some spares from the order so happy to share with any other builders.

Brian


John posted this 14 October 2020

Hello everyone,


I'm new here and I have only a small observation of the differences in the construction of the coils on the two replications of the device.

In one video, the diagram shows that one foil is connected to one coil and the other foil is connected to the other coil, see the picture below.

coil_01


If you watch carefully the video where the coil is disassembled, you can see where the copper foils are connected, both foils are connected to a coil of 22 mH. This would mean that it is a parallel capacitor that is not shown in the diagram.

coil_02

coil_02_1

I am also working on a replica and I hope to share the results of the measurements soon.

Have a nice day, John.

Chris posted this 30 July 2020

Hey Loz,

Nice work My Friend! Good to see your'e back with us! 

I enjoyed my replication on this device. I will post more soon. Yes Jagau has a very nice waveform, its all right with Akula's original machine:


Akula when he shared his work was very informative, very useful! Remember this is all a copy of, a replication of, Andrey Melnichenko's GLED.

The Coil Interactions are hidden partly by the Circuit Operation, but we do have Coil Opposition between L1 and L2.

The Diode D1, is a Current Blocking Diode, ensuring Current flow in one specific direction! The same as I used in my Non Inductive Coil Experiment.

The basic operation is the same, even though the wave shapes are different. Your experiment here uses the same basic function to make this work. 

A few things to try to make this self run:

  • Drop the Input Voltage.
  • Swap the Coils over, L2 = L1 and L1 = L2.
  • Swap the Terminals of one coil only, the Polarity.
  • Add more turns to L2 (54mH) or remove turns from L1. (22mH)


Great work My Friend, its great to see your video! Thanks for sharing!

Best wishes, stay safe and well My Friend!

   Chris

Captainloz posted this 29 July 2020

Hi Guys,

I'm so far behind on this thread. I have this video to share however I'm not sure if it's much help to anyone.  It's really just the start.  I feel bad that I haven't been able to contribute lately.  Hopefully in two more weeks I'll be able to spend more time on this, and really contribute something substantial.   

Beautiful work Jagau!  Thanks for sharing! 

Cheers,

Loz


Chris posted this 12 May 2020

Hey Jagau,

Beautiful Work My Friend! Very nice! Thank You for Sharing!

Best wishes, stay safe and well My Friend!

   Chris

Jagau posted this 12 May 2020

The low frequency component is present only when the 2 copper strips are connected to the first coil only, they act as capacitors and magnetic gap. To have tried different mounting this one is the most effective to date. The lowest voltage and power obtained is from 2.03 volts as you will see in the video.


Work remains to be done to increase the low frequency to around 270 hertz, then adjust the mosfet which should act as a pump recharging the primary capacitor in order to produce a selfrunner.

Jagau

Chris posted this 11 May 2020

Hi Jagau,

Your work is very impressive! I know your'e very talented in Electronics!

I know your work is genuine and very real! So please don't take my post the wrong way! What I shared is only for reference for others, I am not questioning your work!

I hope we do not misunderstand each other, I hope I did not say anything that has offended you!


Some Background:

TinselKoala is very good with Electronics, he used to badger me, to say it nicely, and now it's my turn to show him how serious we are about this.


Please don't take my post the wrong way! I know whats achievable so you have my full support here! I hope others can also see whats achievable! I hope others can see what this is all about, and how serious we are about this! For example, getting professionally made PCB's to make all this work so in the public eye, we are seen as professionals!

Jagau, I have the greatest respect for you and your work! It is great to see such impressive work!

I only referenced TinselKoala's work for others to see what we are doing, and how serious we are!

I would very much appreciate a Video that would be great! Thank You for sharing!

Best wishes, stay well,

   Chris

Jagau posted this 11 May 2020

Hi chris


Sorry , but but I do not use any reference signal like this guys does to produce this image in all his Utube that you showed. 

What I posted here. It is neither a montage nor a fake.

The image you saw is very real and is produced only by the way the potcore was made and no function generator connected,.
I'm going to make a video instead of a photo to demonstrate it, you can judge for yourself what I did. I would never dare to fool people here,

I think it's a serious forum here at least that's what I think.

Jagau

Chris posted this 10 May 2020

Hey Jagau,

Very nice, awesome work! Thank You for Sharing!

You have shown whats possible with an hour or so work! Very nice! Thank You for Sharing! I have been here before, this is where a little time can be involved, in getting the machine to run better, and getting it to go Above Unity.

Optimizing the interactions between the Coils and making sure the right polarity is involved, then this machine can run itself.


He always did refuse to put inside a Faraday Cage, I asked on many occasions, he did not, only claiming Radio Station was powering it, the problem could have been very easily resolved if he had listened. 

This was shown in the original Videos: Video 2


Most of the work is done my friend! Very nice to see! Congratulations!

Best wishes, stay safe and well,

   Chris

Jagau posted this 10 May 2020

Hi chris and captainloz
I did with you for this beautiful project.

Connect on P.S.


After mounting the components and winding up the potcore I got this figure on my oscilloscope.


Compare to Akula

The frequency of the bottom is not good it is only 37 kertz I think Akula had 269 so it's not finished.

The CD4069 with this photo on the mosfet gate 2n7000 (down waveform) but it is too slow and too dirty so work to do on this side.

the precise operating voltage is 2.74 volts


Tell me how you made this circuit and what kind of figure you got so that we can combine our efforts.

You have made a great board Chris, thank you

Jagau

Chris posted this 07 April 2020

Hey Loz,

Nice Work! Thanks for sharing!

I need to get back to work on mine! Finish it off.

Best wishes,

   Chris

Captainloz posted this 07 April 2020

Hi Chris,

I little more progress. Just playing around to see the circuit working on the scope. I'm still waiting for my bobbin to arrive.  Will post another video once I get it done.

Cheers,

Loz


Chris posted this 04 April 2020

Hello and welcome Jynx!

Thank You!

As far as I know, yes, Andrey Melnichenko, and his team, were the first on the GLED. I can find no evidence to show anyone else was before him!

The Top Rail shorting, is L R C Resonant, so the Coil ( L ), the Resistor ( R ) and Capacitor ( C ) have a time constant that can be calculated, the time constant being in seconds, and 1 / s = Frequency. The Shorting is the cause of the Sinusoidal wave forum you see here:

The Video here:


Once the GLED is in operation, the Sinusoidal Waveform is part of the function of operation. Its required. This does not mean once you get this waveform its selfrunning, it means its the start! More work may be required.

Sometimes you may be required to swap the Coils over, from terminal to terminal, also possibly polarity.

Best wishes,

   Chris

Jynx posted this 04 April 2020

Hello guys. My first post here. Nice work on the circuit boards. I have been reviewing the GLED schematics and have a question. Was Andrey Melnichenko the first to do an eternal led lantern? What is the purpose of using the mosfet to short the power supply rail to ground through the resistor?  The Akula schematic does the same thing. 

Captainloz posted this 28 March 2020

Hey Chris,

I got side tracked with this. I just couldn't resist. Making a little headway, just waiting on parts to finish. Looking forward to experimenting with it!  Cheers mate

Loz


Chris posted this 07 March 2020

Hi Chris, could you post details about the integrated circuits used and about the characteristics of the LEDs?

Thanks.


Hey Fighter,

Yes, of course. this is a basic parts list:


I copied from this circuit:


The MC34063 Datasheet is here. The CD4069 Datasheet is here. Just use any LED's you want, I use 10mm White LED's and shave a little off one side, so they fit to the PCB, I have a very tight fitting PCB designed.

I hope this helps!

Best wishes,

   Chris

Fighter posted this 07 March 2020

Hi Chris, could you post details about the integrated circuits used and about the characteristics of the LEDs?

Thanks.

Chris posted this 02 March 2020

My Friends,

I have a little progress on the PCB:


Still a work in progress as you can see.

Best wishes,

   Chris

Jagau posted this 14 February 2020

This little circuit is very unifying, we have to revise several things that we have to share and learn over time

and that will help us understand how we have reached more than 1 unit.


I believe that many will like to reproduce this circuit.


Jagau

Chris posted this 14 February 2020

My Friends,

Here is the Circuit I drew:


I copied Akula's Circuit:


Its a start, and what I based my last experiments on. It may change at any time.

   Chris

We're Light Years Ahead!
Members Online:
What is a Scalar:

In physics, scalars are physical quantities that are unaffected by changes to a vector space basis. Scalars are often accompanied by units of measurement, as in "10 cm". Examples of scalar quantities are mass, distance, charge, volume, time, speed, and the magnitude of physical vectors in general.

You need to forget the Non-Sense that some spout with out knowing the actual Definition of the word Scalar! Some people talk absolute Bull Sh*t!

The pressure P in the formula P = pgh, pgh is a scalar that tells you the amount of this squashing force per unit area in a fluid.

A Scalar, having both direction and magnitude, can be anything! The Magnetic Field, a Charge moving, yet some Numb Nuts think it means Magic Science!

Message from God:

Hello my children. This is Yahweh, the one true Lord. You have found creation's secret. Now share it peacefully with the world.

Ref: Message from God written inside the Human Genome

God be in my head, and in my thinking.

God be in my eyes, and in my looking.

God be in my mouth, and in my speaking.

Oh, God be in my heart, and in my understanding.

Your Support:

More than anything else, your contributions to this forum are most important! We are trying to actively get all visitors involved, but we do only have a few main contributors, which are very much appreciated! If you would like to see more pages with more detailed experiments and answers, perhaps a contribution of another type maybe possible:

PayPal De-Platformed me!

They REFUSE to tell me why!

We now use Wise!

Donate
Use E-Mail: Chris at aboveunity.com

The content I am sharing is not only unique, but is changing the world as we know it! Please Support Us!

Thank You So Much!

Weeks High Earners:
The great Nikola Tesla:

Ere many generations pass, our machinery will be driven by a power obtainable at any point of the universe. This idea is not novel. Men have been led to it long ago by instinct or reason. It has been expressed in many ways, and in many places, in the history of old and new. We find it in the delightful myth of Antheus, who drives power from the earth; we find it among the subtle speculations of one of your splendid mathematicians, and in many hints and statements of thinkers of the present time. Throughout space there is energy. Is this energy static or kinetic? If static, our hopes are in vain; if kinetic - and this we know it is for certain - then it is a mere question of time when men will succeed in attaching their machinery to the very wheelwork of nature.

Experiments With Alternate Currents Of High Potential And High Frequency (February 1892).

Close