Microcontroller Unit Controlled Aeroponics Growing System

  • Topic Is Sticky
  • 1.4K Views
  • Last Post 05 August 2020
Chris posted this 11 June 2020

My Friends,

As a side project, I am going to put together a MCU Controlled Aeroponics Growing System, just simple for a start.

Aeroponics Stats:

  • Chamber is kept at temperatures between 16.7C or 62F to 21.7C or 71F with good stability.
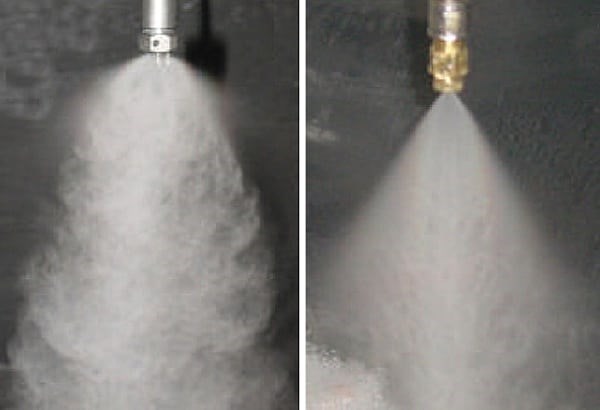
  • The Misting, three to five seconds every 5 minutes, or less than 5 seconds on every 4-5 minutes.
  • PH and EC (Electrical Conductivity) Control.
  • Nutrient mix in the Water that gets sprayed. Recommended replaced every 2 - 3 weeks.


Parts include:

Parts are inexpensive and its a project that just might be able to feed my family cheaply and efficiently with the freshest food possible.


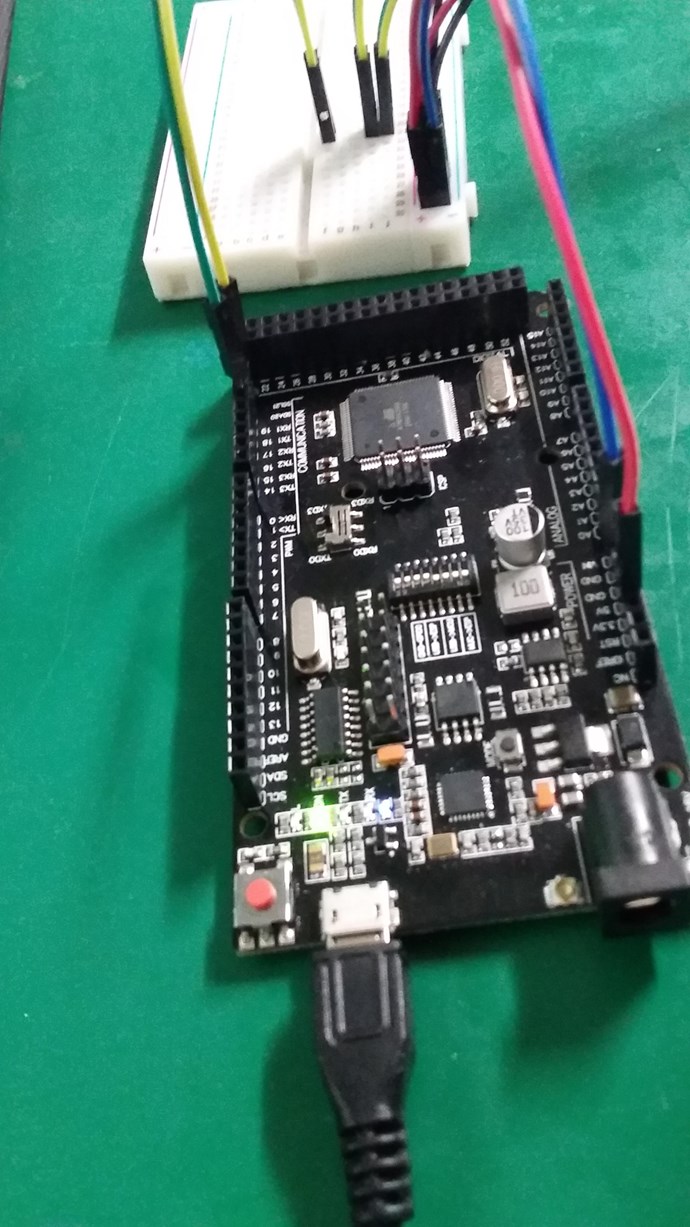
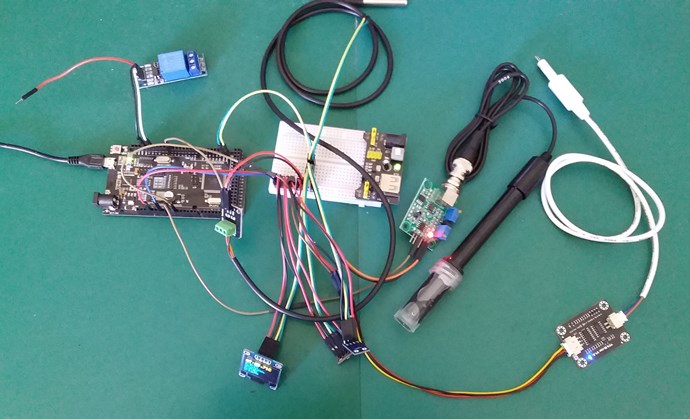
Arduino or Wemos Mega +WiFi R3 Module:


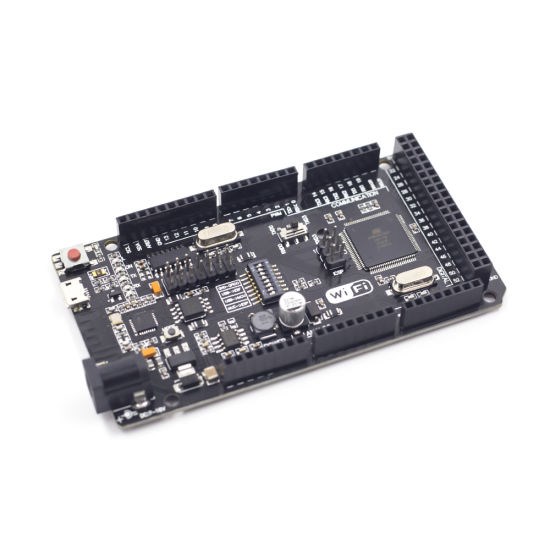
I like the Arduino rebranded stuff. Its cheap and full of features. This has inbuilt WiFi and will be wireless to my network.

Here is some nice code online to get the wireless working, I have slightly modified it: medium.com

/////////////////////////////////////////////////////////////////////////////////////////////////////////////////////////////////
// Header:
#include "WiFiEsp.h"

#ifndef HAVE_HWSERIAL3
#endif

char ssid[] = "SSID";            // your network SSID (name)
char pass[] = "password";        // your network password
int status = WL_IDLE_STATUS;     // the Wifi radio's status

char server[] = "myserver";
const String URI PROGMEM = "/api/exee/UpdatePowerConsumption";

// Initialize the Ethernet client object
WiFiEspClient client;
int amps;


// Setup:
void setup()
{
  // initialize serial for debugging
  Serial.begin(115200);
  // initialize serial for ESP module
  Serial3.begin(115200);
  // initialize ESP module
  WiFi.init(&Serial3);

  // check for the presence of the shield
  if (WiFi.status() == WL_NO_SHIELD) {
    Serial.println("WiFi shield not present");
    // don't continue
    while (true);
  }

  // attempt to connect to WiFi network
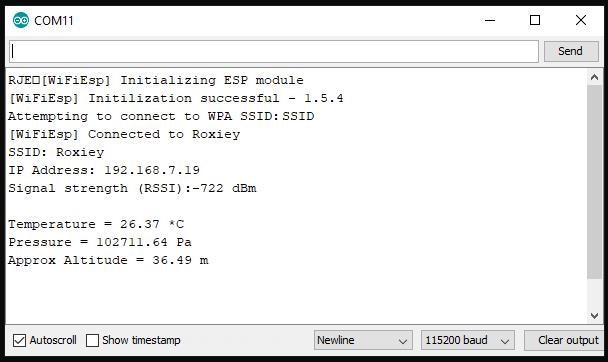
  while ( status != WL_CONNECTED) {
    Serial.print("Attempting to connect to WPA SSID: ");
    Serial.println(ssid);
    // Connect to WPA/WPA2 network
    status = WiFi.begin(ssid, pass);
  }

  // you're connected now, so print out the data
  Serial.println("You're connected to the network");

  printWifiStatus();

  Serial.println();
  Serial.println("Starting connection to server...");
  amps = analogRead(A0);
  String tempData = "";
  tempData.concat("{\"AccessToken\" : \"");
  tempData.concat("AccessToken");
  tempData.concat("\",\"LocationCode\" : \"");
  tempData.concat("L001");
  tempData.concat("\",\"TotalConsumption\" :\"");
  tempData.concat(amps);
  tempData.concat("\"}");
  Serial.println(tempData);

  if (client.connect(server, 80)) {
    Serial.println(F("con..."));
    // send the HTTP GET request:
    client.println("POST " + URI + " HTTP/1.1");
    client.println("Host: " + String(server));
    client.println("Content-Type: application/json");
    client.print("Content-Length: ");
    client.println(tempData.length());
    client.println();
    client.println(tempData);
    // note the time that the connection was made:

  } else {
    // if you couldn't make a connection:
    Serial.println(F("con failed"));
  }

}


// Main Loop:
void loop()
{
  // if there are incoming bytes available
  // from the server, read them and print them
  while (client.available()) {
    char c = client.read();
    Serial.write(c);
  }

  // if the server's disconnected, stop the client
  if (!client.connected()) {
    Serial.println();
    Serial.println("Disconnecting from server...");
    client.stop();

    // do nothing forevermore
    while (true);
  }
}


// Print WiFi Status:
void printWifiStatus()
{
  // print the SSID of the network you're attached to
  Serial.print("SSID: ");
  Serial.println(WiFi.SSID());

  // print your WiFi shield's IP address
  IPAddress ip = WiFi.localIP();
  Serial.print("IP Address: ");
  Serial.println(ip);

  // print the received signal strength
  long rssi = WiFi.RSSI();
  Serial.print("Signal strength (RSSI):");
  Serial.print(rssi);
  Serial.println(" dBm");
}


Tons of cool libraries and code samples online if you want to look around. I hope to have more soon.


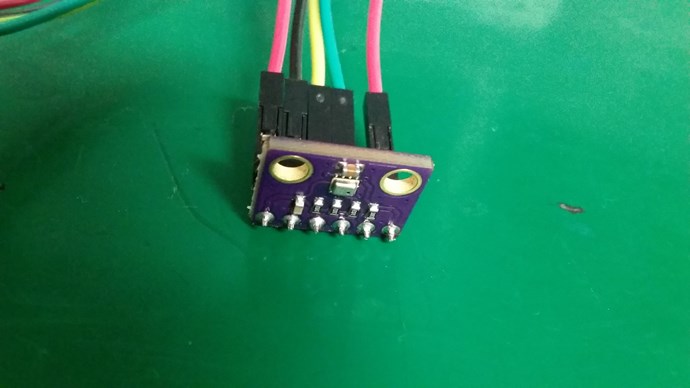
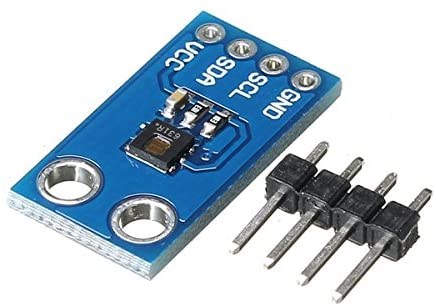
GY-BMP280-3.3 High Precision Atmospheric Pressure Sensor Module:

I want to measure the Atmospheric pressure also, its a simple cheap sensor that may hep give results.

This example requires: https://github.com/adafruit/Adafruit_BMP280_Library and https://github.com/adafruit/Adafruit_Sensor

The following code example is from: arduinolearning.com/ or best-microcontroller-projects.com

/***************************************************************************
This is a library for the BMP280 humidity, temperature & pressure sensor

Designed specifically to work with the Adafruit BMEP280 Breakout
----> http://www.adafruit.com/products/2651

These sensors use I2C or SPI to communicate, 2 or 4 pins are required
to interface.

Adafruit invests time and resources providing this open source code,
please support Adafruit andopen-source hardware by purchasing products
from Adafruit!

Written by Limor Fried & Kevin Townsend for Adafruit Industries.
BSD license, all text above must be included in any redistribution
***************************************************************************/

#include <Wire.h>
#include <SPI.h>
#include <Adafruit_Sensor.h>
#include <Adafruit_BMP280.h>

#define BMP_SCK 13
#define BMP_MISO 12
#define BMP_MOSI 11
#define BMP_CS 10

Adafruit_BMP280 bme; // I2C
//Adafruit_BMP280 bme(BMP_CS); // hardware SPI
//Adafruit_BMP280 bme(BMP_CS, BMP_MOSI, BMP_MISO, BMP_SCK);

void setup() {
Serial.begin(9600);
Serial.println(F("BMP280 test"));

if (!bme.begin()) {
Serial.println("Could not find a valid BMP280 sensor, check wiring!");
while (1);
}
}

void loop() {
Serial.print("Temperature = ");
Serial.print(bme.readTemperature());
Serial.println(" *C");

Serial.print("Pressure = ");
Serial.print(bme.readPressure());
Serial.println(" Pa");

Serial.print("Approx altitude = ");
Serial.print(bme.readAltitude(1013.25)); // this should be adjusted to your local forcase
Serial.println(" m");

Serial.println();
delay(2000);
}


CJMCU-1080 HDC1080 High Precision Temperature And Humidity Sensor:


This Temperature and Humidity Sensor is to measure the Enclosure, Green House, Air Temperature and Humidity. Its a reasonably expensive sensor, but does a fine job for its price.

You will need to download the following library and install it from  https://github.com/closedcube/ClosedCube_HDC1080_Arduino 

The Texas Instruments website gives code examples, but this example is from: arduinolearning.com

#include <Wire.h>
#include "ClosedCube_HDC1080.h"

ClosedCube_HDC1080 hdc1080;

void setup()
{
Serial.begin(9600);
Serial.println("ClosedCube HDC1080 Arduino Test");

// Default settings:
// - Heater off
// - 14 bit Temperature and Humidity Measurement Resolutions
hdc1080.begin(0x40);

Serial.print("Manufacturer ID=0x");
Serial.println(hdc1080.readManufacturerId(), HEX); // 0x5449 ID of Texas Instruments
Serial.print("Device ID=0x");
Serial.println(hdc1080.readDeviceId(), HEX); // 0x1050 ID of the device

printSerialNumber();

}

void loop()
{
Serial.print("T=");
Serial.print(hdc1080.readTemperature());
Serial.print("C, RH=");
Serial.print(hdc1080.readHumidity());
Serial.println("%");
delay(3000);
}

void printSerialNumber() {
Serial.print("Device Serial Number=");
HDC1080_SerialNumber sernum = hdc1080.readSerialNumber();
char format[12];
sprintf(format, "%02X-%04X-%04X", sernum.serialFirst, sernum.serialMid, sernum.serialLast);
Serial.println(format);
}


DS18B20 Temperature Sensor:


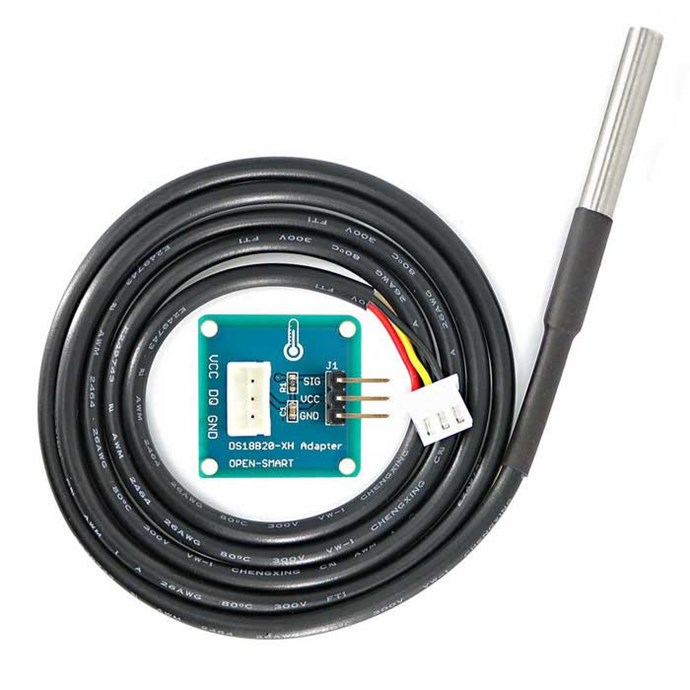
This Temperature Sensor is for the Water Temperature. This will be the Water in the tank.

The code example here: randomnerdtutorials.com

/*********
  Rui Santos
  Complete project details at https://randomnerdtutorials.com  
  Based on the Dallas Temperature Library example
*********/

#include <OneWire.h>
#include <DallasTemperature.h>

// Data wire is conntec to the Arduino digital pin 4
#define ONE_WIRE_BUS 4

// Setup a oneWire instance to communicate with any OneWire devices
OneWire oneWire(ONE_WIRE_BUS);

// Pass our oneWire reference to Dallas Temperature sensor 
DallasTemperature sensors(&oneWire);

void setup(void)
{
  // Start serial communication for debugging purposes
  Serial.begin(9600);
  // Start up the library
  sensors.begin();
}

void loop(void){ 
  // Call sensors.requestTemperatures() to issue a global temperature and Requests to all devices on the bus
  sensors.requestTemperatures(); 

  Serial.print("Celsius temperature: ");
  // Why "byIndex"? You can have more than one IC on the same bus. 0 refers to the first IC on the wire
  Serial.print(sensors.getTempCByIndex(0)); 
  Serial.print(" - Fahrenheit temperature: ");
  Serial.println(sensors.getTempFByIndex(0));
  delay(1000);
}


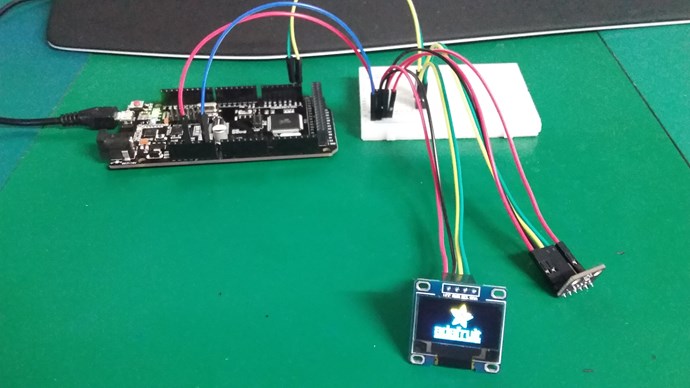
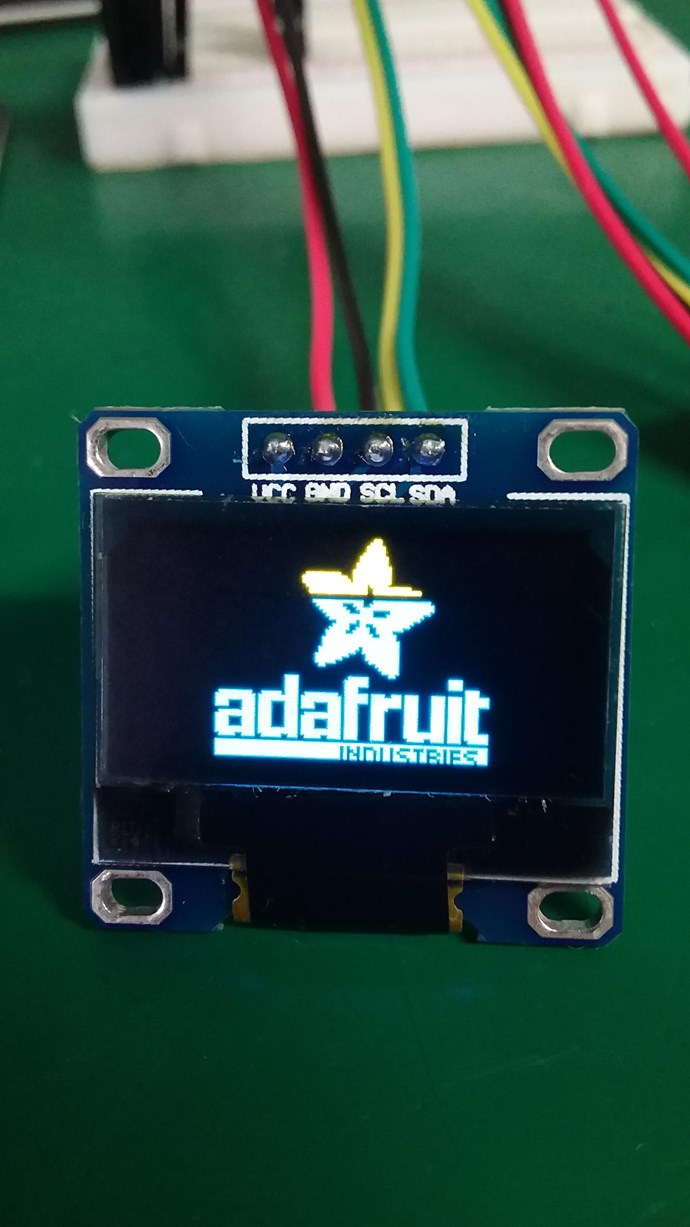
0.96 Inch 4Pin Blue Yellow IIC I2C OLED Display Module:

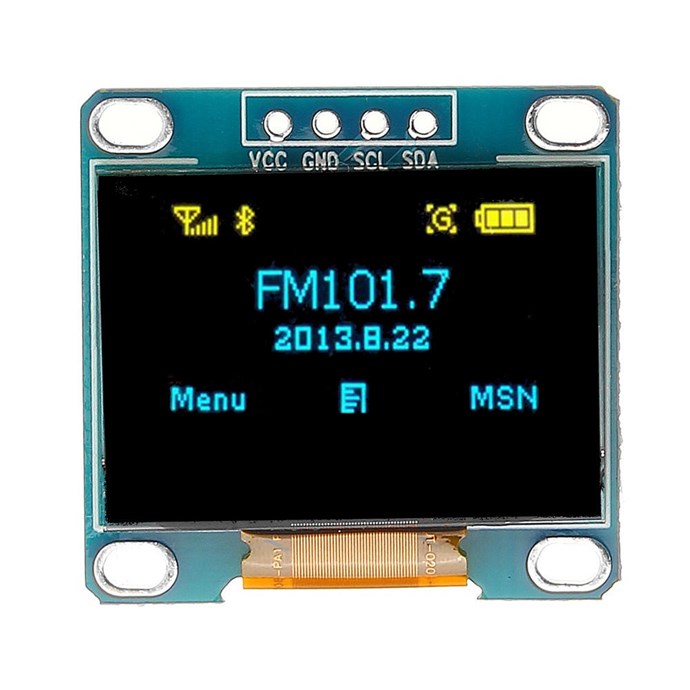
The net is filled with code examples: create.arduino.cc

//www.diyusthad.com
#include <Wire.h>
#include <Adafruit_GFX.h>
#include <Adafruit_SSD1306.h>

#define OLED_RESET 4
Adafruit_SSD1306 display(128, 64, &Wire, OLED_RESET);

//Paste your bitmap here

void setup(){
  display.begin(SSD1306_SWITCHCAPVCC, 0x3D); //or 0x3C
  display.clearDisplay(); //for Clearing the display
  display.drawBitmap(0, 0, myBitmap, 128, 64, WHITE); // display.drawBitmap(x position, y position, bitmap data, bitmap width, bitmap height, color)
  display.display();
}

void loop() { }


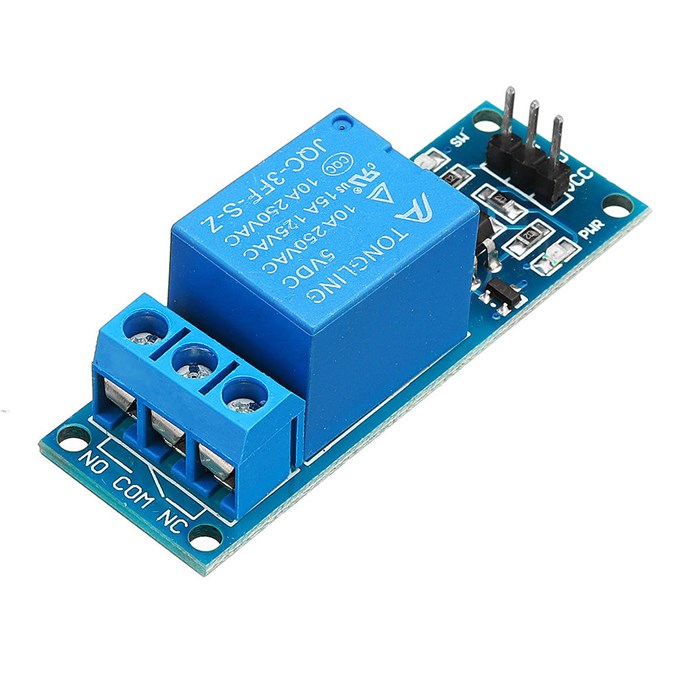
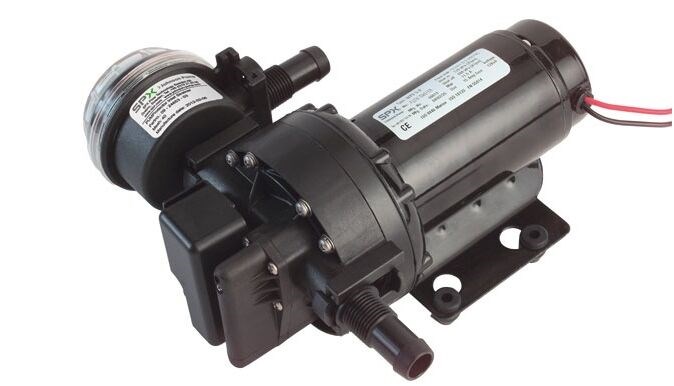
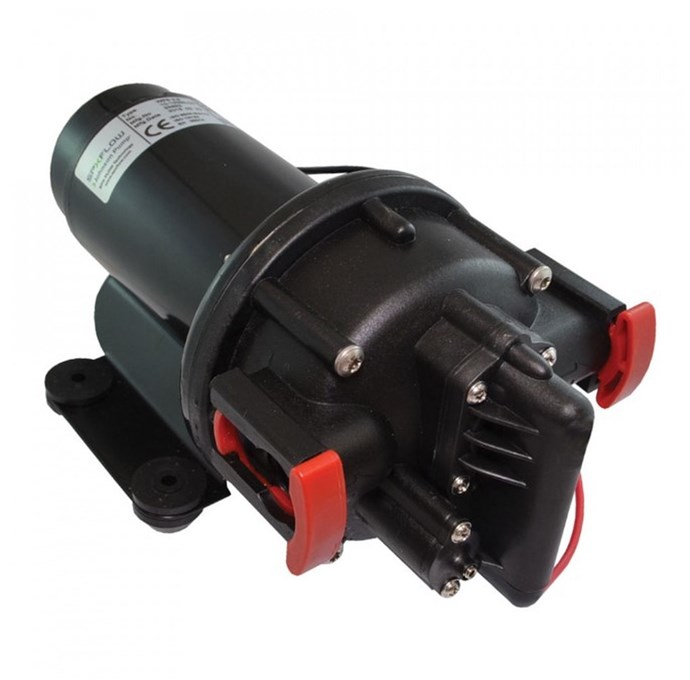
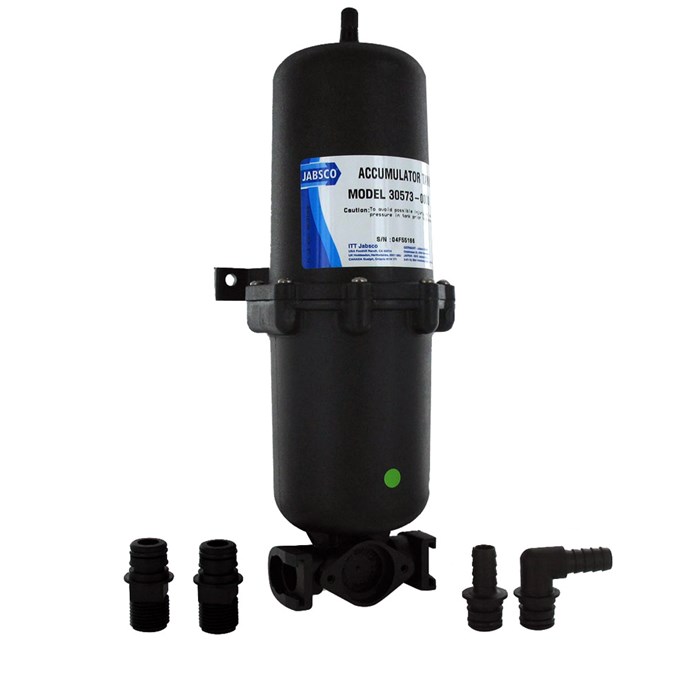
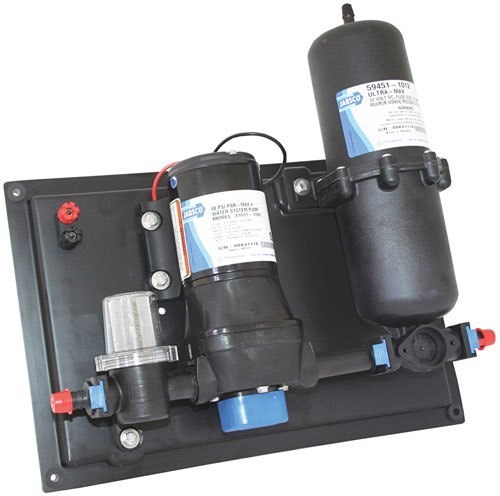
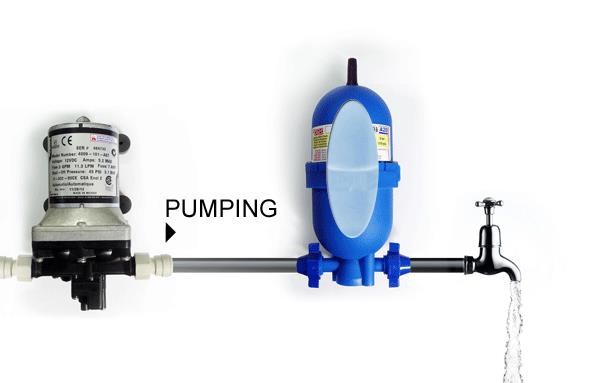
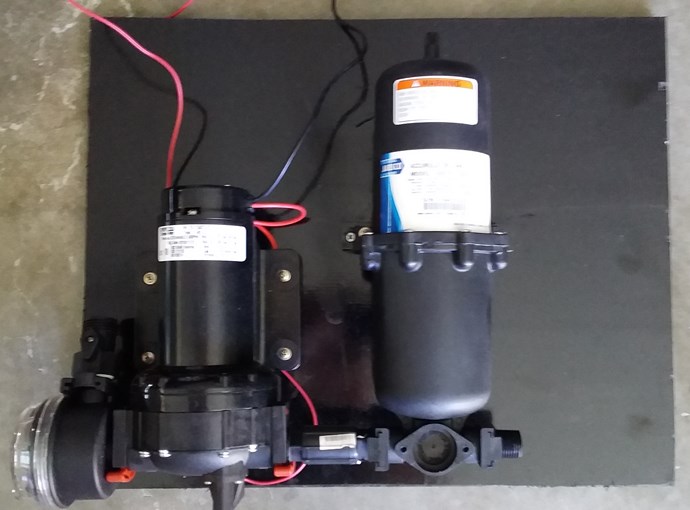
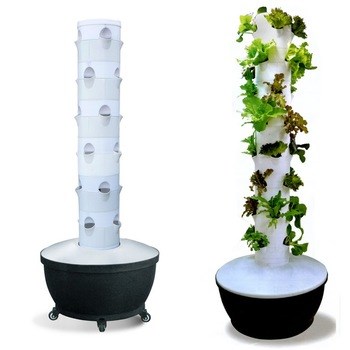
I have not yet purchased a Pump or Aeroponic Housings. I am still researching these items. Perhaps a baby version of this might be a good start:


Our little CopyCat friends have just opened a thread, almost the same as the Growing Threads here. I don't care, they could try to be original however!

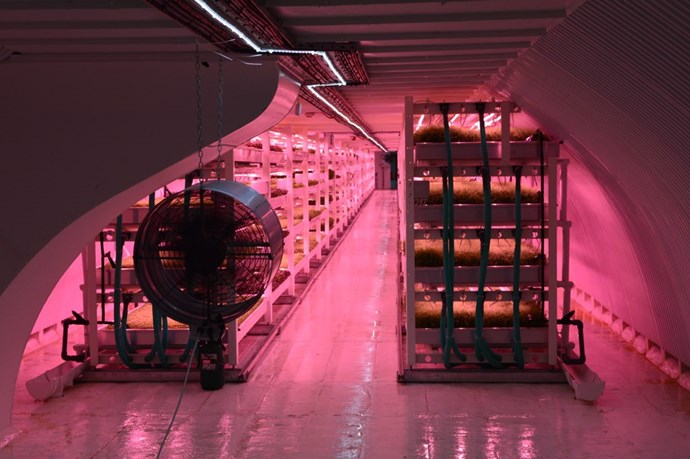
Sustainability and knowing your Garden just might be a very important thing in the near future!

Of course, with Aboveunity Energy System, these Aeroponics Systems are possible on a large scale underground! All you need do, is learn and build them as we have.

Best wishes, Stay safe and well My Friends,

   Chris

Order By: Standard | Newest | Votes
Chris posted this 17 June 2020

My Friends,

I want to update you a little, I spent an hour or so today on the Wireless, the WiFi. Some tricks to get it working:

Download:


1: I had to update the ESP8266 WiFi Chip Firmware - Out of the Box, it does not work.

To do this, your "Mega +WiFi R3 Module ATmega2560+ESP8266 32Mb Memory USB-TTL CH340G Mega NodeMCU ESP8266" board, needs to have the Jumper buttons set:


Luckily this is very easy, the best method I found was following this video:


I have python installed on my System already. If you don't already, you will need pyserial installed:

  • pip3 install pyserial
  • conda install pyserial
  • pip install pyserial


So from the Command Prompt, type in:

python esptool.py --port <YOURCOMPORT> write_flash 0x0000 "At_firmware_bin1.54\AiThinker_ESP8266_DIO_32M_32M_20160615_V1.5.4.bin"


Other options exist, Windows Command Prompt and Powershell, a very good tutorial here.


$port1 = new-Object System.IO.Ports.SerialPort COM#,74880,None,8,one
$port.open()
$port.WriteLine("some string")
$port.ReadLine()
$port.Close()


With something like this to write to the Com Port:


# Read file to an array of bytes:
$bytes = [System.IO.File]::ReadAllBytes("path_to_the_file")

# Init Com Port and Connect, send data:
$port1 = new-Object System.IO.Ports.SerialPort COM#,74880,None,8,one
$port1.Open()
$port1.Write( $bytes )
$port1.ReadExisting()
$port1.Close()


NOTE: The above is an example only, not tested, and not recommended to use if you do not have any experience with this sort of thing. The above code is missing the Memory Allocation and this needs to be added. Perhaps Zanzal or other Dev's among us might have more to share? I have a Stackoverflow question Here.

If you wish, you can connect to USB to serial using an application called Putty. You can connect to the board


Just change COM11 to your com port. Of the top of my head I don't know the commands to upload the flash, but a quick internet search will no doubt help.

2: When your'e done, finished the firmware Flash, set your Jumper Switches back to: "CH340 connect to Mega2560 COM3 connect to ESP8266" mode, so you can use the ATMega and the ESP8266 like a normal Arduino.


3: Play with your WiFi and connect to your Wireless Router:

/////////////////////////////////////////////////////////////////////////////////////////////////////////////////////////////////////////
// Head:
int status = WL_IDLE_STATUS;     // the Wifi radio's status

// WiFi Credentials:
char ssid[] = "SSID";            // your network SSID (name)
char pass[] = "********";        // your network password

// Initialize WiFi Client:
WiFiEspClient client;


/////////////////////////////////////////////////////////////////////////////////////////////////////////////////////////////////////////
// Setup the Board:
void setup() {

  // Initialize Debugging Serial:
  Serial.begin(115200);

  // Initialize serial for ESP module: COM3 = Srial3
  Serial3.begin(115200);

  // Initialize ESP8266 Module:
  WiFi.init(&Serial3);

  // Check ESP8266 Status:
  if (WiFi.status() == WL_NO_SHIELD) {
    Serial.println("WiFi shield not present");
    // don't continue
    while (true);
  }

  // Attempt to connect to WiFi network:
  while (status != WL_CONNECTED) {
    Serial.print("Attempting to connect to WPA SSID: ");
    Serial.println(ssid);

    // Connect to WPA/WPA2 Network:
    status = WiFi.begin(ssid, pass);
  }

  // You're connected:
  Serial.println("You're connected to the network");

  // Print the SSID of the Network:
  Serial.print("SSID: ");
  Serial.println(WiFi.SSID());

  // Print your ESP8266 WiFi IP Address:
  IPAddress ip = WiFi.localIP();
  Serial.print("IP Address: ");
  Serial.println(ip);

  // Print Signal Strength:
  long rssi = WiFi.RSSI();
  Serial.print("Signal strength (RSSI):");
  Serial.print(rssi);
  Serial.println(" dBm");
}


/////////////////////////////////////////////////////////////////////////////////////////////////////////////////////////////////////////
// Board Main Loop:
void loop() {

  // Read incomming Data:
  while (client.available()) {
    char c = client.read();
    Serial.write(c);
  }

  // Process Data...
}


For the price, these boards are awesome! I would never go back to a non-WiFi board now! This is so useful!


Of course, this could be used as a WiFi PWM Source for our Energy Machines also! I believe CD has already done something similar?

Resources:


Best wishes, stay safe and well My Friends,

   Chris

Augenblick posted this 18 June 2020

Chris,

This project is awesome. WiFi Arduino! Aeroponics/Hydroponics. This is something serious to consider.

Thanks for sharing!

-A-


Chris posted this 18 June 2020

Thanks  Augenblick!

Some early Progress:


More sensors should be arriving soon. I want to add as much as I can but only whats necessary. The WeMos Mega with WiFi is awesome! 

Best wishes, stay safe and well,

   Chris

Chris posted this 21 June 2020

My Friends,

I want to share a little bit of code I spent a bit of time on today. Its PWM on the Arduino Mega, using Timer One and Register settings:

////////////////////////////////////////////////////////////////////////////////////
// MEGA Pins:                                                                     //
// timer 0 ->  pin 4               // System Timer, not a good idea to mess with! //
// timer 1 ->  pin 11, 12, 13      // Good option, 16 Bit timer.                  //
// timer 2 ->  pin 9, 10                                                          //
// timer 3 ->  pin 2, 3, 5                                                        //
// timer 4 ->  pin 6, 7, 8                                                        //
// timer 5 -> pin 44, 45, 46                                                      //
////////////////////////////////////////////////////////////////////////////////////
// Set the 16 Bits of Resolution on the Timer:
float Freq = 65536;


// put your setup code here, to run once:
void setup() {

  // Init Serial:
  Serial.begin(115200);

  // Mega Timer One PWM Pins:
  pinMode(11, OUTPUT);
  pinMode(12, OUTPUT);

  // Config Timer:
  Timer1FastPWMMode();
}


// Fast PWM Mode ( FPWM )
void Timer1FastPWMMode(){

  // Timer 1 16 bit:
  TCCR1A = 0;
  TCCR1B = 0;

  // Fast PWM needs bits (WGM10 & WGM12) set to One, (ComA and B) need to be set for Compare Match Pins 11 and 12:
  TCCR1A |= (1 << WGM10) | (1 << WGM11) | (1 << COM1A1) | (1 << COM1B1);

  // Configure Prescaler (CSX) and Configure Fast PWM Mode (WGM12 and 13):
  TCCR1B |= (1 << CS10) | (1 << WGM12) | (1 << WGM13);
}


void loop() {

  // The counter simply overruns when it passes its maximum 16-bit value (MAX = 0xFFFF (65535)) and then restarts from the BOTTOM (0x0000).
  if(Freq >= 1){
    OCR1A = Freq--;
    delay(10);

    // Set 50% Duty Cycle:
    OCR1B = OCR1A / 2;
    delay(10);

    // N = Prescaler:
    float N = 1.00;
    float fclock = 16000000.00; // 16e6
    float Frequency = (fclock / (N * (1 + OCR1A)));

    // Display Output:
    Serial.print("Frequency: ");
    Serial.print(Frequency);
    Serial.print("Hz. Resolution: ");
    Serial.print((log(OCR1A + 1)/log(2)));
    Serial.println(" bits");
  }
}


It is interesting the power of the PWM of such a small IC! Observing the Output as the Register Counts Down, as the Frequency Increases, it is amazing to see how fast the Frequency changes as the Resolution Changes.

The ATmega-2560 Datasheet is Here.

This data is too bit to post here, but if you want to run the code, its above. Just rough Code, not cleaned up much!

Of course, this PWM Code will be extremely useful for others here wanting to Automate the PWM Procedures of the Power Technologies we are also working on! Perhaps Software PLL may be something we can also add in the not to distant future?

   Chris

Chris posted this 21 June 2020

My Friends,

A small update. I have most sensors Coded and they now need to be tested and calibrated. Here is a Code Snippet:

///////////////////////////////////////////////////////////////////////////////////////////////////////////////////////////////////////
// Header:                                                                                                                           //
////////////////////////////////////////                                                                                             //
// Includes:                          //                                                                                             //
#include <Wire.h>                     // I2C Protocol...                                                                             //
#include "WiFiEsp.h"                  // ESP8266 WiFi Library...                                                                     //
#include <Adafruit_GFX.h>             // OLed SSD1306 Library...                                                                     //
#include <Adafruit_SSD1306.h>         // OLed SSD1306 Library...                                                                     //
#include <Adafruit_Sensor.h>          // BMP280 Sensor Library...                                                                    //
#include <Adafruit_BMP280.h>          // BMP280 Sensor Library...                                                                    //
#include <OneWire.h>                  // OneWire Library DS18B20 Dallas Temperature Sensor...                                        //
#include <DallasTemperature.h>        // DS18B20 Dallas Temperature Sensor Library...                                                //
#include "ClosedCube_HDC1080.h"       // HDC1080 Sensor Library...                                                                   //

#include <EEPROM.h>                   //                                                                                             //
#include "GravityTDS.h"               // The TDS Water Conductivity Sensor...                                                        //
                                      /////////////////////////////////////////////////////////////////////////////////////////////////


///////////////////////////////////////////////////////////////////////////////////////////////////////////////////////////////////////
// ESP8266 WiFi Init:                                                                                                                //
////////////////////////////////////////                                                                                             //
// Initialize WiFi Client:            //                                                                                             //
WiFiEspClient WiFiClient;             // Your ESP8266 WiFi Module.                                                                   //
                                      //                                                                                             //
// Wireless Link Status:              //                                                                                             //
int status = WL_IDLE_STATUS;          // ESP8266 Wifi Radio Status.                                                                  //
                                      //                                                                                             //
// WiFi Credentials:                  //                                                                                             //
char ssid[] = "SSID";                 // Your Network SSID (name).                                                                   //
char pass[] = "********";             // Your Network Password.                                                                      //
                                      /////////////////////////////////////////////////////////////////////////////////////////////////


///////////////////////////////////////////////////////////////////////////////////////////////////////////////////////////////////////
// OLED Display Init:                                                                                                                //
////////////////////////////////////////                                                                                             //
// Define OLED Reference:             //                                                                                             //                                      
Adafruit_SSD1306 OLED(4);             //                                                                                             //
                                      //                                                                                             //
// 128 x 64 pixel display             //                                                                                             //
#if (SSD1306_LCDHEIGHT != 64)         // Open: "C:\Users\<UserName>\Documents\Arduino\libraries\Adafruit_SSD1306\Adafruit_SSD1306.h" //
#error("Oled Height Error!");         // Comment: #define SSD1306_128_32                                                             //
#endif                                // Un-Comment: #define SSD1306_128_64                                                          //
                                      /////////////////////////////////////////////////////////////////////////////////////////////////


///////////////////////////////////////////////////////////////////////////////////////////////////////////////////////////////////////
// BMP280 Atmospheric Init:                                                                                                          //
////////////////////////////////////////                                                                                             //
// Atmospheric Init:                  //                                                                                             //
Adafruit_BMP280 BMP280;               // The BMP280 Sensor Reference...                                                              //
                                      /////////////////////////////////////////////////////////////////////////////////////////////////


///////////////////////////////////////////////////////////////////////////////////////////////////////////////////////////////////////
// DallasTemperature Temperature Init:                                                                                               //
////////////////////////////////////////                                                                                             //
// Temperature Sensor Init:           //                                                                                             //
OneWire wire(7);                      // One Wire Reference, set the pin to your Digital Pin.                                        //
DallasTemperature DS18B20(&wire);     // The DS18B20 DallasTemperature Sensor Reference...                                           //
                                      /////////////////////////////////////////////////////////////////////////////////////////////////


///////////////////////////////////////////////////////////////////////////////////////////////////////////////////////////////////////
// HDC1080 Atmospheric Init:                                                                                                         //
////////////////////////////////////////                                                                                             //
// Atmospheric Sensor Init:           //                                                                                             //
ClosedCube_HDC1080 hdc1080;           // HDC1080 Sensor Reference...                                                                 //
                                      /////////////////////////////////////////////////////////////////////////////////////////////////


///////////////////////////////////////////////////////////////////////////////////////////////////////////////////////////////////////
// TDS Water Conductivity Sensor Init:                                                                                               //
////////////////////////////////////////                                                                                             //
// Sensor Analog Pin Init:            //                                                                                             //
#define TdsSensorPin A1               // The Analog Pin to Read...                                                                   //
                                      //                                                                                             //
// Conductivity Sensor Init:          //                                                                                             //
GravityTDS gravityTds;                // The TDS Water Conductivity Sensor Init...                                                   //
                                      /////////////////////////////////////////////////////////////////////////////////////////////////


///////////////////////////////////////////////////////////////////////////////////////////////////////////////////////////////////////
// Setup the Board:                                                                                                                  //
void setup() {/////////////////////////////////////////////////////////////////////////////////////////////////////////////////////////

  // Initialize Debugging Serial:
  Serial.begin(115200);

  // Initialize HDC1080 Sensor:
  hdc1080.begin(0x40);

  // Initialize DS18B20 DallasTemperature Sensor:
  DS18B20.begin();

  // Initialize the BMP280 Sensor:
  if (!BMP280.begin()) {
    Serial.println("Could not find a valid BMP280 sensor, check wiring!");
    while (1);
  }

  // Initialize the OLED Screen:
  OLED.begin(SSD1306_SWITCHCAPVCC, 0x3C);

  // Initialize the TDS Water Conductivity Sensor:
  gravityTds.setPin(TdsSensorPin);
  // Reference Voltage on ADC, default 5.0V on Arduino UNO:
  gravityTds.setAref(5.0);
  // 1024 for 10bit ADC;4096 for 12bit ADC:
  gravityTds.setAdcRange(1024);
  gravityTds.begin();

  // Initialize serial for ESP module: COM3 = Srial3
  Serial3.begin(115200);

  // Initialize ESP8266 Module:
  WiFi.init(&Serial3);

  // Check ESP8266 Status:
  if (WiFi.status() == WL_NO_SHIELD) {

    // You may need to flash Firmware: http://www.aboveunity.com/thread/mcu-controlled-aeroponics-growing-system/?order=all#comment-62b6f4f5-0191-4df5-9130-abdd015c807c
    Serial.println("WiFi shield not found! See above comment!");

    // Don't go any further:
    while (true);
  }

  // Attempt to connect to WiFi Network:
  while (status != WL_CONNECTED) {
    Serial.print("Attempting to connect to Network: \"");
    Serial.print(ssid);
    Serial.println("\" using WPA/WPA2");

    // Connect to WiFi Network:
    status = WiFi.begin(ssid, pass);
  }

  // Print WiFi Stats:
  PrintWiFiStats();
}


///////////////////////////////////////////////////////////////////////////////////////////////////////////////////////////////////////
// Board Main Loop:                                                                                                                  //
void loop() {//////////////////////////////////////////////////////////////////////////////////////////////////////////////////////////

  // Clean Line:
  Serial.println();

  // Read incomming Data:
  while (WiFiClient.available()) {
    char c = WiFiClient.read();
    Serial.write(c);
  }

  // Process Data...
  ProcessWiFiData();

  // Read BMP280 Sensor: Atmospheric
  ReadBMP280Sensor();

  // Read DS18B20 Temperature: Water
  ReadDS18B20Sensor();

  // Read HDC1080 Sensor: Atmospheric
  ReadHDC1080Sensor();

  // Read TDS Water Conductivity Sensor:
  float EC = ReadTDSSensor(BMP280.readTemperature());

  // Read Water PH Sensor:
  float PH = ReadPHSensor();

  // Display Temp:
  DisplayOledData(BMP280.readTemperature(), 20.13, PH, EC);

  // Delay the Loop:
  delay(2000);
}


///////////////////////////////////////////////////////////////////////////////////////////////////////////////////////////////////////
// Print WiFi Stats:                                                                                                                 //
void PrintWiFiStats(){/////////////////////////////////////////////////////////////////////////////////////////////////////////////////

  // Print the SSID of the Network:
  Serial.print("SSID: ");
  Serial.println(WiFi.SSID());

  // Print your ESP8266 WiFi IP Address:
  IPAddress ip = WiFi.localIP();
  Serial.print("IP Address: ");
  Serial.println(ip);

  // Print Signal Strength:
  long rssi = WiFi.RSSI();
  Serial.print("Signal strength (RSSI):");
  Serial.print(rssi);
  Serial.println(" dBm");
}


///////////////////////////////////////////////////////////////////////////////////////////////////////////////////////////////////////
// Process WiFi Data:                                                                                                                //
void ProcessWiFiData(){////////////////////////////////////////////////////////////////////////////////////////////////////////////////

  // Process Data here...

}


///////////////////////////////////////////////////////////////////////////////////////////////////////////////////////////////////////
// Display Text on Oled:                                                                                                             //
void DisplayOledData(float at, float wt, float ph, float ec){//////////////////////////////////////////////////////////////////////////

  // GND: Power Gound
  // VCC: 2.2V-5.5V
  // SCL: CLK clock (High level 2.2V-5.5V)
  // SDA: MOSI data (High level 2.2V-5.5V)

  // Color: Blue and Yellow LED
  // Resolution: 128x64
  // Power: 0.06W
  // Wide power supply range: DC 3V-5V
  // Temperature: -30°C to 70°C
  // Dimension: 29.28 x 27.1 mm (LW)
  // Compatible with 3.3V and 5V control chip I / O level
  // OLED internal drive chip: SSD136

  // Clear:
  OLED.clearDisplay();

  // Set Text Size: 2X-scale
  OLED.setTextSize(2);

  // Set Txt Colour:
  OLED.setTextColor(SSD1306_WHITE);

  // Set Cursor:
  OLED.setCursor(0, 0);

  // Line 1:
  OLED.print(F("AT:"));
  OLED.print(at);
  //OLED.print("°");
  OLED.println(F("C"));

  // Set Text Size:
  OLED.setTextSize(1);

  // Line 2:
  OLED.print(F("WT:"));
  OLED.print(wt);
  //OLED.print("°");
  OLED.println(F("C"));

  // Line 3: PH scale of 0 to 14
  OLED.print(F("PH:"));
  OLED.print(ph);
  OLED.println(F("pH"));

  // Line 4:
  OLED.print(F("EC:"));
  OLED.print(ec);
  OLED.println(F("PPM"));

  // Display:
  OLED.display();

  // Delay:
  delay(100);
}


///////////////////////////////////////////////////////////////////////////////////////////////////////////////////////////////////////
// Read BMP280 Sensor:                                                                                                               //
void ReadBMP280Sensor(){///////////////////////////////////////////////////////////////////////////////////////////////////////////////

  // Model: GY-BMP280-3.3
  // Chip: BMP280
  // Power supply: 3V
  // Communication method: Standard IIC/SPI communication protocol
  // Air pressure: 300-1100hPa
  // Pin: 2.54mm
  // Module size: 11.5mm*15mm

  //////////////////////////////////////////////////////////////////////////////////////////////
  // SeaLevelhPa = 1013.25 Default Value...                                                   //
  // Find yours in your local Weather Forecast:                                               //
  // https://www.yr.no/place/australia/queensland/gold%20coast/hour_by_hour_detailed.html     //
  // The current hPa at sea level://////////////////////////////////////////////////////////////
  float SeaLevelhPa = 1022.5;        

  // Get the approximate altitude above sea level in meters:
  float Altitude = BMP280.readAltitude(SeaLevelhPa);

  // Get Celsius:
  float Celsius = BMP280.readTemperature();

  // Get Pressure:
  float Pressure = BMP280.readPressure();

  Serial.print("Temperature: ");
  Serial.print(Celsius);
  Serial.println("C");

  Serial.print("Pressure: ");
  Serial.print(Pressure / 100); // To Hector Pascals.
  Serial.println("hPa");

  Serial.print("Approx Altitude: ");
  Serial.print(Altitude);
  Serial.println("m");
}


///////////////////////////////////////////////////////////////////////////////////////////////////////////////////////////////////////
// Read DS18B20 Dallas Temerature Sensor:                                                                                            //
void ReadDS18B20Sensor(){//////////////////////////////////////////////////////////////////////////////////////////////////////////////

  // Size: 23 x 20mm
  // Chip: DS18B20
  // Voltage: 3.3V, 5V
  // Port: Digital two-way single bus
  // Temperature range: -50 ℃ to + 125 ℃
  // Applicable sensor: Waterproof DS18B20 temperature sensor
  // Port: DAT (18B20 data) VCC (18B20 positive) GND (18B20 negative)
  // Suitable platform: and Raspberry Pi


  // Get Temperatures:
  DS18B20.requestTemperatures();

  // Get Celsius:
  float Celsius = DS18B20.getTempCByIndex(0);

  // Get Fahrenheit:
  float Fahrenheit = DS18B20.toFahrenheit(Celsius);

  // We use the function ByIndex, and as an example get the temperature from the first sensor only:  for the device 1 (index 0) is
  Serial.print("Water Temperature: ");
  Serial.print(Celsius);
  Serial.println("C");
}


///////////////////////////////////////////////////////////////////////////////////////////////////////////////////////////////////////
// Read HDC1080 Temerature Sensor:                                                                                                   //
void ReadHDC1080Sensor(){//////////////////////////////////////////////////////////////////////////////////////////////////////////////

  // Relative Humidity Accuracy ±2% (typical)
  // Temperature Accuracy ±0.2°C (typical)
  // Excellent Stability at High Humidity
  // 14 Bit Measurement Resolution
  // 100 nA Sleep Mode Current
  // Average Supply Current:
  //                          710 nA @ 1sps, 11 bit RH Measurement
  //                          1.3 µA @ 1sps, 11 bit RH and Temperature Measurement
  // Supply Voltage 2.7 V to 5.5 V
  // Small 3 mm × 3 mm Device Footprint
  // I2C Interface


  // Get Celsius:
  float Celsius = hdc1080.readTemperature();

  // Get Humidity:
  float Humidity = hdc1080.readHumidity();

  Serial.print("Temperature: ");
  Serial.print(Celsius);
  Serial.println("C");

  Serial.print("Humidity: ");
  Serial.print(Humidity);
  Serial.println("%");
}


///////////////////////////////////////////////////////////////////////////////////////////////////////////////////////////////////////
// Read Water PH Sensor:                                                                                                             //
float ReadPHSensor(){//////////////////////////////////////////////////////////////////////////////////////////////////////////////////

  // Product Name: PH value acquisition sensor module (with temperature compensation)
  // Heating voltage: 5±0.2V (AC·DC)
  // Working current: 5-10mA
  // Detection concentration range: PH0-14
  // Detection temperature range: 0-80 °C
  // Response time: ≤ 5S
  // Stabilization time: ≤60S
  // Component power consumption: ≤0.5W
  // Working temperature: -10~50°C (nominal temperature 20°C)
  // Working humidity: 95% RH (nominal humidity 65% RH)
  // Service life: 3 years
  // Size: 42mm × 32mm × 20mm
  // Weight: 25g
  // Output mode: analog voltage signal output

  // Number of Samples to take:
  float Samples = 10.0;

  // Totsl Values:
  float TotalReadings = 0.0;

  // Read the Analog Pin BufferSize Times and Store:
  for(int i = 0; i < Samples; i++) {

    // Analog Read:
    // Data type: int
    // Although it is limited to the resolution of the analog to digital converter (0-1023 for 10 bits or 0-4095 for 12 bits).

    // Save Reading:
    TotalReadings += (float)analogRead(A0);

    // Delay:
    delay(30);
  }

  // PH values are from: 0 to 14:
  float ScaleMax = 14.0;

  // Analog Resolution is 1024 on most Arduino MCU's:
  float AnalogResolution = 1024.0;

  // Calculate:
  float Average = (float)(((TotalReadings / Samples) * ScaleMax) / AnalogResolution);

  // Print to Serial:
  Serial.print("PH: ");
  Serial.print(Average);
  Serial.println("pH");

  return Average;
}


///////////////////////////////////////////////////////////////////////////////////////////////////////////////////////////////////////
// Read TDS Water Conductivity Sensor:                                                                                               //
float ReadTDSSensor(float temperature){////////////////////////////////////////////////////////////////////////////////////////////////

  // Input Voltage: DC 3.3 ~ 5.5V 
  // Output Voltage: 0 ~ 2.3V 
  // Working Current: 3 ~ 6mA 
  // TDS Measurement Range: 0 ~ 1000ppm 
  // TDS Measurement Accuracy: ± 10% F.S. (25 ℃) 
  // Module Interface: XH2.54-3P 
  // Electrode Interface: XH2.54-2P

  // Pass the Temperature for Compensation:
  gravityTds.setTemperature(temperature);  

  // Sample and Calculate: 
  gravityTds.update();

  // Get Sensor Reading:
  float TDS = gravityTds.getTdsValue();

  Serial.print("EC: ");
  Serial.print(TDS);
  Serial.println("PPM");

  return TDS;
}


This Code is beta and is not the finished version! Things need to be added , such as the Pump Control. This is part of the last Timer update but as of today is not ready for release.

As much as anything else, this is a backup of my current Code, to show you its getting closer!

Best wishes, stay safe and well My Friends,

   Chris

Chris posted this 22 June 2020

My Friends,

I got the Pump Monitoring working, 4 Seconds on, 5 Minutes off:

///////////////////////////////////////////////////////////////////////////////////////////////////////////////////////////////////////
// Header:                                                                                                                           //
////////////////////////////////////////                                                                                             //
// Includes:                          //                                                                                             //
#include <Wire.h>                     // I2C Protocol...                                                                             //
#include "WiFiEsp.h"                  // ESP8266 WiFi Library...                                                                     //
#include <Adafruit_GFX.h>             // OLed SSD1306 Library...                                                                     //
#include <Adafruit_SSD1306.h>         // OLed SSD1306 Library...                                                                     //
#include <Adafruit_Sensor.h>          // BMP280 Sensor Library...                                                                    //
#include <Adafruit_BMP280.h>          // BMP280 Sensor Library...                                                                    //
#include <OneWire.h>                  // OneWire Library DS18B20 Dallas Temperature Sensor...                                        //
#include <DallasTemperature.h>        // DS18B20 Dallas Temperature Sensor Library...                                                //
#include "ClosedCube_HDC1080.h"       // HDC1080 Sensor Library...                                                                   //

#include <EEPROM.h>                   //                                                                                             //
#include "GravityTDS.h"               // The TDS Water Conductivity Sensor...                                                        //
                                      /////////////////////////////////////////////////////////////////////////////////////////////////


///////////////////////////////////////////////////////////////////////////////////////////////////////////////////////////////////////
// Timer Counter:                                                                                                                    //
////////////////////////////////////////                                                                                             //
int Seconds = 0;                      //                                                                                             //
bool State = false;                   //                                                                                             //
int MinutesOn = (int)(0.067 * 60);    // 0.067 Minutes * 60 Seconds = ‭4.02‬ Seconds...                                                //
int MinutesOff = 5 * 60;              // X Minutes * 60 Seconds = X Minutes...                                                       //
                                      /////////////////////////////////////////////////////////////////////////////////////////////////


///////////////////////////////////////////////////////////////////////////////////////////////////////////////////////////////////////
// ESP8266 WiFi Init:                                                                                                                //
////////////////////////////////////////                                                                                             //
// Initialize WiFi Client:            //                                                                                             //
WiFiEspClient WiFiClient;             // Your ESP8266 WiFi Module.                                                                   //
                                      //                                                                                             //
// Wireless Link Status:              //                                                                                             //
int status = WL_IDLE_STATUS;          // ESP8266 Wifi Radio Status.                                                                  //
                                      //                                                                                             //
// WiFi Credentials:                  //                                                                                             //
char ssid[] = "SSID";                 // Your Network SSID (name).                                                                   //
char pass[] = "********";             // Your Network Password.                                                                      //
                                      /////////////////////////////////////////////////////////////////////////////////////////////////


///////////////////////////////////////////////////////////////////////////////////////////////////////////////////////////////////////
// OLED Display Init:                                                                                                                //
////////////////////////////////////////                                                                                             //
// Define OLED Reference:             //                                                                                             //                                      
Adafruit_SSD1306 OLED(4);             //                                                                                             //
                                      //                                                                                             //
// 128 x 64 pixel display             //                                                                                             //
#if (SSD1306_LCDHEIGHT != 64)         // Open: "C:\Users\<UserName>\Documents\Arduino\libraries\Adafruit_SSD1306\Adafruit_SSD1306.h" //
#error("Oled Height Error!");         // Comment: #define SSD1306_128_32                                                             //
#endif                                // Un-Comment: #define SSD1306_128_64                                                          //
                                      /////////////////////////////////////////////////////////////////////////////////////////////////


///////////////////////////////////////////////////////////////////////////////////////////////////////////////////////////////////////
// BMP280 Atmospheric Init:                                                                                                          //
////////////////////////////////////////                                                                                             //
// Atmospheric Init:                  //                                                                                             //
Adafruit_BMP280 BMP280;               // The BMP280 Sensor Reference...                                                              //
                                      /////////////////////////////////////////////////////////////////////////////////////////////////


///////////////////////////////////////////////////////////////////////////////////////////////////////////////////////////////////////
// DallasTemperature Temperature Init:                                                                                               //
////////////////////////////////////////                                                                                             //
// Temperature Sensor Init:           //                                                                                             //
OneWire wire(7);                      // One Wire Reference, set the pin to your Digital Pin.                                        //
DallasTemperature DS18B20(&wire);     // The DS18B20 DallasTemperature Sensor Reference...                                           //
                                      /////////////////////////////////////////////////////////////////////////////////////////////////


///////////////////////////////////////////////////////////////////////////////////////////////////////////////////////////////////////
// HDC1080 Atmospheric Init:                                                                                                         //
////////////////////////////////////////                                                                                             //
// Atmospheric Sensor Init:           //                                                                                             //
ClosedCube_HDC1080 hdc1080;           // HDC1080 Sensor Reference...                                                                 //
                                      /////////////////////////////////////////////////////////////////////////////////////////////////


///////////////////////////////////////////////////////////////////////////////////////////////////////////////////////////////////////
// TDS Water Conductivity Sensor Init:                                                                                               //
////////////////////////////////////////                                                                                             //
// Sensor Analog Pin Init:            //                                                                                             //
#define TdsSensorPin A1               // The Analog Pin to Read...                                                                   //
                                      //                                                                                             //
// Conductivity Sensor Init:          //                                                                                             //
GravityTDS gravityTds;                // The TDS Water Conductivity Sensor Init...                                                   //
                                      /////////////////////////////////////////////////////////////////////////////////////////////////


///////////////////////////////////////////////////////////////////////////////////////////////////////////////////////////////////////
// Setup the Board:                                                                                                                  //
void setup() {/////////////////////////////////////////////////////////////////////////////////////////////////////////////////////////

  // Initialize Debugging Serial:
  Serial.begin(115200);

  // Configure Pump Control Pin:
  pinMode(12, OUTPUT);

  // Configure Timer One:
  ConfigureTimerOne();

  // Initialize HDC1080 Sensor:
  hdc1080.begin(0x40);

  // Initialize DS18B20 DallasTemperature Sensor:
  DS18B20.begin();

  // Initialize the BMP280 Sensor:
  if (!BMP280.begin()) {
    Serial.println("Could not find a valid BMP280 sensor, check wiring!");
    while (1);
  }

  // Initialize the OLED Screen:
  OLED.begin(SSD1306_SWITCHCAPVCC, 0x3C);

  // Initialize the TDS Water Conductivity Sensor:
  gravityTds.setPin(TdsSensorPin);
  // Reference Voltage on ADC, default 5.0V on Arduino UNO:
  gravityTds.setAref(5.0);
  // 1024 for 10bit ADC;4096 for 12bit ADC:
  gravityTds.setAdcRange(1024);
  gravityTds.begin();

  // Initialize serial for ESP module: COM3 = Srial3
  Serial3.begin(115200);

  // Initialize ESP8266 Module:
  WiFi.init(&Serial3);

  // Check ESP8266 Status:
  if (WiFi.status() == WL_NO_SHIELD) {

    // You may need to flash Firmware: http://www.aboveunity.com/thread/mcu-controlled-aeroponics-growing-system/?order=all#comment-62b6f4f5-0191-4df5-9130-abdd015c807c
    Serial.println("WiFi shield not found! See above comment!");

    // Don't go any further:
    while (true);
  }

  // Attempt to connect to WiFi Network:
  while (status != WL_CONNECTED) {
    Serial.print("Attempting to connect to Network: \"");
    Serial.print(ssid);
    Serial.println("\" using WPA/WPA2");

    // Connect to WiFi Network:
    status = WiFi.begin(ssid, pass);
  }

  // Print WiFi Stats:
  PrintWiFiStats();
}


///////////////////////////////////////////////////////////////////////////////////////////////////////////////////////////////////////
// Board Main Loop:                                                                                                                  //
void loop() {//////////////////////////////////////////////////////////////////////////////////////////////////////////////////////////

  // Clean Line:
  Serial.println();

  // Water Pump Timing:
  CheckTimingForWaterPump();

  // Read incomming Data:
  while (WiFiClient.available()) {
    char c = WiFiClient.read();
    Serial.write(c);
  }

  // Process Data...
  ProcessWiFiData();

  // Read BMP280 Sensor: Atmospheric
  ReadBMP280Sensor();

  // Read DS18B20 Temperature: Water
  ReadDS18B20Sensor();

  // Read HDC1080 Sensor: Atmospheric
  ReadHDC1080Sensor();

  // Read TDS Water Conductivity Sensor:
  float EC = ReadTDSSensor(BMP280.readTemperature());

  // Read Water PH Sensor:
  float PH = ReadPHSensor();

  // Display Temp:
  DisplayOledData(BMP280.readTemperature(), 20.13, PH, EC);

  // Delay the Loop:
  delay(2000);
}


///////////////////////////////////////////////////////////////////////////////////////////////////////////////////////////////////////
// Check Timing For Water Pump:                                                                                                      //
void CheckTimingForWaterPump(){////////////////////////////////////////////////////////////////////////////////////////////////////////

    // Water Pump Timing:
  if(Seconds >= MinutesOff && State == false){
    Seconds = 0;
    State = true;
    digitalWrite(12, State);
  }
  else 
  if(Seconds >= MinutesOn && State == true){
    Seconds = 0;
    State = false;
    digitalWrite(12, State);
  }
}


///////////////////////////////////////////////////////////////////////////////////////////////////////////////////////////////////////
// Calculate Timer One TCNT:                                                                                                         //
float CalculateTCNT(float ftarget){////////////////////////////////////////////////////////////////////////////////////////////////////

  // The N variable represents the prescaler factor (1, 8, 64, 256, or 1024).
  // Prescalers: 1, 8, 64, 256, or 1024.
  float prescaler = 1024.00;
  float fclock = 16000000.00;
  float tcntx = 65536.0 - (fclock/(prescaler * ftarget));

  // Min: 0 Max: 65536.0
  return tcntx;
}


///////////////////////////////////////////////////////////////////////////////////////////////////////////////////////////////////////
// Timer One Interrupt:                                                                                                              //
ISR(TIMER1_OVF_vect){//////////////////////////////////////////////////////////////////////////////////////////////////////////////////

  // Set the Timer Counter:
  TCNT1 = CalculateTCNT(1);

  // Increment the Second Counter:
  Seconds++;
}


///////////////////////////////////////////////////////////////////////////////////////////////////////////////////////////////////////
// Configure Timer One:                                                                                                              //
void ConfigureTimerOne(){//////////////////////////////////////////////////////////////////////////////////////////////////////////////

  // Timer 1 16 bit:
  TCCR1A = 0;
  TCCR1B = 0;

  // Set the Timer Counter:
  TCNT1 = CalculateTCNT(1);

  // Configure Prescaler (CSX):
  TCCR1B |= (1 << CS10) | (0 << CS11) | (1 << CS12);

  // Init's the ISR(TIMER1_OVF_vect) Interrupt Timer Overflow:
  TIMSK1 |= (1 << TOIE1);
}


///////////////////////////////////////////////////////////////////////////////////////////////////////////////////////////////////////
// Print WiFi Stats:                                                                                                                 //
void PrintWiFiStats(){/////////////////////////////////////////////////////////////////////////////////////////////////////////////////

  // Print the SSID of the Network:
  Serial.print("SSID: ");
  Serial.println(WiFi.SSID());

  // Print your ESP8266 WiFi IP Address:
  IPAddress ip = WiFi.localIP();
  Serial.print("IP Address: ");
  Serial.println(ip);

  // Print Signal Strength:
  long rssi = WiFi.RSSI();
  Serial.print("Signal strength (RSSI):");
  Serial.print(rssi);
  Serial.println(" dBm");
}


///////////////////////////////////////////////////////////////////////////////////////////////////////////////////////////////////////
// Process WiFi Data:                                                                                                                //
void ProcessWiFiData(){////////////////////////////////////////////////////////////////////////////////////////////////////////////////

  // Process Data here...

}


///////////////////////////////////////////////////////////////////////////////////////////////////////////////////////////////////////
// Display Text on Oled:                                                                                                             //
void DisplayOledData(float at, float wt, float ph, float ec){//////////////////////////////////////////////////////////////////////////

  // GND: Power Gound
  // VCC: 2.2V-5.5V
  // SCL: CLK clock (High level 2.2V-5.5V)
  // SDA: MOSI data (High level 2.2V-5.5V)

  // Color: Blue and Yellow LED
  // Resolution: 128x64
  // Power: 0.06W
  // Wide power supply range: DC 3V-5V
  // Temperature: -30°C to 70°C
  // Dimension: 29.28 x 27.1 mm (LW)
  // Compatible with 3.3V and 5V control chip I / O level
  // OLED internal drive chip: SSD136

  // Clear:
  OLED.clearDisplay();

  // Set Text Size: 2X-scale
  OLED.setTextSize(2);

  // Set Txt Colour:
  OLED.setTextColor(SSD1306_WHITE);

  // Set Cursor:
  OLED.setCursor(0, 0);

  // Line 1:
  OLED.print(F("AT:"));
  OLED.print(at);
  //OLED.print("°");
  OLED.println(F("C"));

  // Set Text Size:
  OLED.setTextSize(1);

  // Line 2:
  OLED.print(F("WT:"));
  OLED.print(wt);
  //OLED.print("°");
  OLED.println(F("C"));

  // Line 3: PH scale of 0 to 14
  OLED.print(F("PH:"));
  OLED.print(ph);
  OLED.println(F("pH"));

  // Line 4:
  OLED.print(F("EC:"));
  OLED.print(ec);
  OLED.println(F("PPM"));

  // Display:
  OLED.display();

  // Delay:
  delay(100);
}


///////////////////////////////////////////////////////////////////////////////////////////////////////////////////////////////////////
// Read BMP280 Sensor:                                                                                                               //
void ReadBMP280Sensor(){///////////////////////////////////////////////////////////////////////////////////////////////////////////////

  // Model: GY-BMP280-3.3
  // Chip: BMP280
  // Power supply: 3V
  // Communication method: Standard IIC/SPI communication protocol
  // Air pressure: 300-1100hPa
  // Pin: 2.54mm
  // Module size: 11.5mm*15mm

  //////////////////////////////////////////////////////////////////////////////////////////////
  // SeaLevelhPa = 1013.25 Default Value...                                                   //
  // Find yours in your local Weather Forecast:                                               //
  // https://www.yr.no/place/australia/queensland/gold%20coast/hour_by_hour_detailed.html     //
  // The current hPa at sea level://////////////////////////////////////////////////////////////
  float SeaLevelhPa = 1022.5;        

  // Get the approximate altitude above sea level in meters:
  float Altitude = BMP280.readAltitude(SeaLevelhPa);

  // Get Celsius:
  float Celsius = BMP280.readTemperature();

  // Get Pressure:
  float Pressure = BMP280.readPressure();

  Serial.print("Temperature: ");
  Serial.print(Celsius);
  Serial.println("C");

  Serial.print("Pressure: ");
  Serial.print(Pressure / 100); // To Hector Pascals.
  Serial.println("hPa");

  Serial.print("Approx Altitude: ");
  Serial.print(Altitude);
  Serial.println("m");
}


///////////////////////////////////////////////////////////////////////////////////////////////////////////////////////////////////////
// Read DS18B20 Dallas Temerature Sensor:                                                                                            //
void ReadDS18B20Sensor(){//////////////////////////////////////////////////////////////////////////////////////////////////////////////

  // Size: 23 x 20mm
  // Chip: DS18B20
  // Voltage: 3.3V, 5V
  // Port: Digital two-way single bus
  // Temperature range: -50 ℃ to + 125 ℃
  // Applicable sensor: Waterproof DS18B20 temperature sensor
  // Port: DAT (18B20 data) VCC (18B20 positive) GND (18B20 negative)
  // Suitable platform: and Raspberry Pi


  // Get Temperatures:
  DS18B20.requestTemperatures();

  // Get Celsius:
  float Celsius = DS18B20.getTempCByIndex(0);

  // Get Fahrenheit:
  float Fahrenheit = DS18B20.toFahrenheit(Celsius);

  // We use the function ByIndex, and as an example get the temperature from the first sensor only:  for the device 1 (index 0) is
  Serial.print("Water Temperature: ");
  Serial.print(Celsius);
  Serial.println("C");
}


///////////////////////////////////////////////////////////////////////////////////////////////////////////////////////////////////////
// Read HDC1080 Temerature Sensor:                                                                                                   //
void ReadHDC1080Sensor(){//////////////////////////////////////////////////////////////////////////////////////////////////////////////

  // Relative Humidity Accuracy ±2% (typical)
  // Temperature Accuracy ±0.2°C (typical)
  // Excellent Stability at High Humidity
  // 14 Bit Measurement Resolution
  // 100 nA Sleep Mode Current
  // Average Supply Current:
  //                          710 nA @ 1sps, 11 bit RH Measurement
  //                          1.3 µA @ 1sps, 11 bit RH and Temperature Measurement
  // Supply Voltage 2.7 V to 5.5 V
  // Small 3 mm × 3 mm Device Footprint
  // I2C Interface


  // Get Celsius:
  float Celsius = hdc1080.readTemperature();

  // Get Humidity:
  float Humidity = hdc1080.readHumidity();

  Serial.print("Temperature: ");
  Serial.print(Celsius);
  Serial.println("C");

  Serial.print("Humidity: ");
  Serial.print(Humidity);
  Serial.println("%");
}


///////////////////////////////////////////////////////////////////////////////////////////////////////////////////////////////////////
// Read Water PH Sensor:                                                                                                             //
float ReadPHSensor(){//////////////////////////////////////////////////////////////////////////////////////////////////////////////////

  // Product Name: PH value acquisition sensor module (with temperature compensation)
  // Heating voltage: 5±0.2V (AC·DC)
  // Working current: 5-10mA
  // Detection concentration range: PH0-14
  // Detection temperature range: 0-80 °C
  // Response time: ≤ 5S
  // Stabilization time: ≤60S
  // Component power consumption: ≤0.5W
  // Working temperature: -10~50°C (nominal temperature 20°C)
  // Working humidity: 95% RH (nominal humidity 65% RH)
  // Service life: 3 years
  // Size: 42mm × 32mm × 20mm
  // Weight: 25g
  // Output mode: analog voltage signal output

  // Number of Samples to take:
  float Samples = 10.0;

  // Totsl Values:
  float TotalReadings = 0.0;

  // Read the Analog Pin BufferSize Times and Store:
  for(int i = 0; i < Samples; i++) {

    // Analog Read:
    // Data type: int
    // Although it is limited to the resolution of the analog to digital converter (0-1023 for 10 bits or 0-4095 for 12 bits).

    // Save Reading:
    TotalReadings += (float)analogRead(A0);

    // Delay:
    delay(30);
  }

  // PH values are from: 0 to 14:
  float ScaleMax = 14.0;

  // Analog Resolution is 1024 on most Arduino MCU's:
  float AnalogResolution = 1024.0;

  // Calculate:
  float Average = (float)(((TotalReadings / Samples) * ScaleMax) / AnalogResolution);

  // Print to Serial:
  Serial.print("PH: ");
  Serial.print(Average);
  Serial.println("pH");

  return Average;
}


///////////////////////////////////////////////////////////////////////////////////////////////////////////////////////////////////////
// Read TDS Water Conductivity Sensor:                                                                                               //
float ReadTDSSensor(float temperature){////////////////////////////////////////////////////////////////////////////////////////////////

  // Input Voltage: DC 3.3 ~ 5.5V 
  // Output Voltage: 0 ~ 2.3V 
  // Working Current: 3 ~ 6mA 
  // TDS Measurement Range: 0 ~ 1000ppm 
  // TDS Measurement Accuracy: ± 10% F.S. (25 ℃) 
  // Module Interface: XH2.54-3P 
  // Electrode Interface: XH2.54-2P

  // Pass the Temperature for Compensation:
  gravityTds.setTemperature(temperature);  

  // Sample and Calculate: 
  gravityTds.update();

  // Get Sensor Reading:
  float TDS = gravityTds.getTdsValue();

  Serial.print("EC: ");
  Serial.print(TDS);
  Serial.println("PPM");

  return TDS;
}


Pin 12, will control a Water Pump, most likely on a Relay like this:


Best wishes, stay safe and well My Friends,

   Chris

thaelin posted this 23 June 2020

This so much remind me of the Pod Farming setup we were discussing some years ago. We too was going to use the Aurdrino as it is so versitle and easy to program with all kinds of add-ons too. I so wish it had taken off instead of dwindling of into obscurity and nothingness.


Keep up the great ideas , it will be a journey worth the time and efforts. We were considering a 5 to 7 story pod for the start.

thay


Chris posted this 08 July 2020

My Friends,

A small update.


I have done some research and have gone with a Pressure Water Pump System that Caravans and Boats typically use:


Which will be mounted in a similar fashion to this:


It works like this:


Please Note: What I am showing here is over-kill for this project! It is not necessary to make this work! The reason I am using this system is for flexibility for future projects. A cheap $30 pump can be used to make this work.

For proper Aeroponics, a 50 micron water particle is recommended, this means some pressure in the line is best:

The common droplet size for home aeroponic systems is 30-80 microns, and 50 microns is considered optimal in general. 

Ref: researchgate.net


This is what the water mist could look like:


Of course you can use water droplets any size, only getting different results and Grow Rates. A Water Droplet or flow over the plants roots, is Hydroponics, and this works fine.

Here is some good tips:


Best wishes, stay safe and well My Friends,

   Chris

Chris posted this 05 August 2020

My Friends,

A small update today. "Know your garden", a very wise quote from the Hopi Indian People.

I received my Pneumatic 12 Volt 1/2 Inch Water Valve:


At this stage, the Water Valve will be installed close to the tank as possible, close to the Misting Nozzles. This will give us more Line Pressure, and the Accumulator, or Pressure Tank, will reduce the load on the Pump, extending the Pump life.

The Water Valve will control the Misting Time in the Areoponic Tube. 

I have my Pump Unit on a Board, this pump unit is designed for a Caravan or Boat:


With a little more work and a few more parts, I expect to soon have a working system. The Code for the Microcontroller is mostly done, laid out in a basic working format. I think this will evolve over time like everything does.

I am using the White PVC, recommended, Food Grade apparently and ok for low pressure systems. I was thinking about Black PVC Pipe, but had trouble getting Fittings for the tube that I could trust up to 50 Psi. I honestly thought that would be easy! Maybe I need to do some more shopping.

I bought this system due to the multi purpose of this system. You don't need to go to this extent if you don't want to! A cheap $15 dollar pump is enough!

Slowly purchased over time, I have my sensor array in a prototype setup:


All the major things are accounted for:

  • Air Temperature.
  • Water Temperature.
  • PH.
  • EC.
  • Humidity.
  • Air Pressure no so important.


The System is ready now for an up and coming test run. After a test run I might do a PCB to tidy up the I2C Bus and Power Rails, possibly mounting the Arduino Mega also. I am still thinking on this.

Growing Underground is something that is common these days, Land is expensive, using the Land for more important things seems a better and more logical option.


An underground Glass House of sorts.

Best wishes, stay safe and well My Friends,

   Chris

We're Light Years Ahead!
Members Online:

No one online at the moment


What is a Scalar:

In physics, scalars are physical quantities that are unaffected by changes to a vector space basis. Scalars are often accompanied by units of measurement, as in "10 cm". Examples of scalar quantities are mass, distance, charge, volume, time, speed, and the magnitude of physical vectors in general.

You need to forget the Non-Sense that some spout with out knowing the actual Definition of the word Scalar! Some people talk absolute Bull Sh*t!

The pressure P in the formula P = pgh, pgh is a scalar that tells you the amount of this squashing force per unit area in a fluid.

A Scalar, having both direction and magnitude, can be anything! The Magnetic Field, a Charge moving, yet some Numb Nuts think it means Magic Science!

Message from God:

Hello my children. This is Yahweh, the one true Lord. You have found creation's secret. Now share it peacefully with the world.

Ref: Message from God written inside the Human Genome

God be in my head, and in my thinking.

God be in my eyes, and in my looking.

God be in my mouth, and in my speaking.

Oh, God be in my heart, and in my understanding.

Your Support:

More than anything else, your contributions to this forum are most important! We are trying to actively get all visitors involved, but we do only have a few main contributors, which are very much appreciated! If you would like to see more pages with more detailed experiments and answers, perhaps a contribution of another type maybe possible:

PayPal De-Platformed me!

They REFUSE to tell me why!

We now use Wise!

Donate
Use E-Mail: Chris at aboveunity.com

The content I am sharing is not only unique, but is changing the world as we know it! Please Support Us!

Thank You So Much!

Weeks High Earners:
The great Nikola Tesla:

Ere many generations pass, our machinery will be driven by a power obtainable at any point of the universe. This idea is not novel. Men have been led to it long ago by instinct or reason. It has been expressed in many ways, and in many places, in the history of old and new. We find it in the delightful myth of Antheus, who drives power from the earth; we find it among the subtle speculations of one of your splendid mathematicians, and in many hints and statements of thinkers of the present time. Throughout space there is energy. Is this energy static or kinetic? If static, our hopes are in vain; if kinetic - and this we know it is for certain - then it is a mere question of time when men will succeed in attaching their machinery to the very wheelwork of nature.

Experiments With Alternate Currents Of High Potential And High Frequency (February 1892).

Close